Managing Customers
The Customers tab allows you to manage theall customercustomer-related data.data Youin one place. From here, you can createadd new customers, or edit the existing onesprofiles, fromand thisview tab.customer purchase history. Maintaining accurate customer records helps improve customer engagement, loyalty, and personalized service.
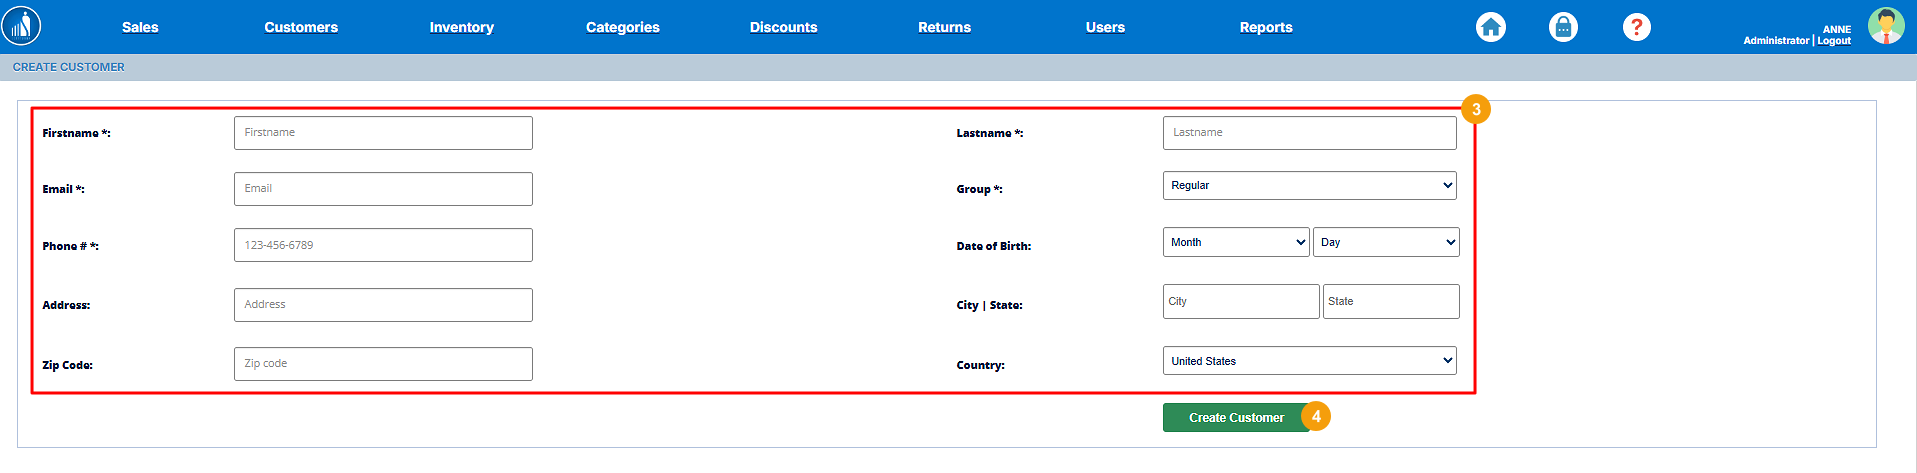
How to Add a New Customer?Customer
1.To create a new customer profile:
-
Go to the Customers
tab.tab from the main navigation menu. -
2.
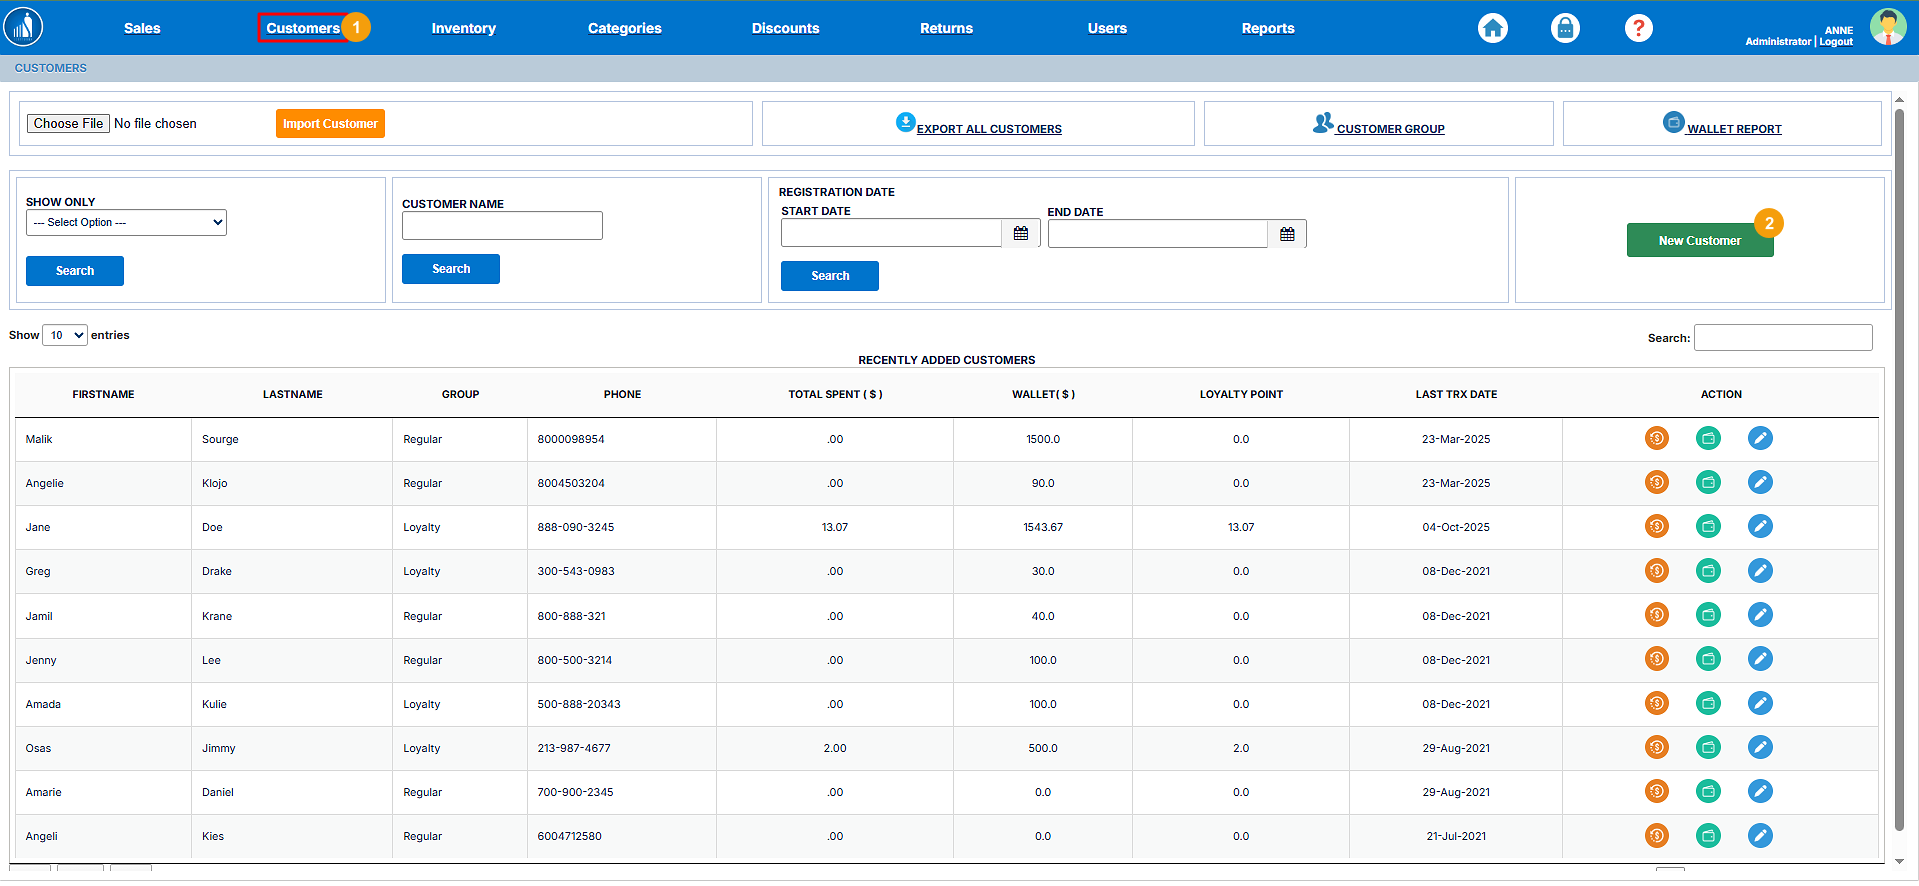
3.Enter Enterthe required details
4.Click Save to create the customer details.record.
4.Tip:HitAddingCreatecustomerCustomer.details at the point of sale helps you build a loyalty database, track purchase history, and send personalized offers or receipts automatically in the future.
Importing Customers
If you wantneed to add multiple customers all at once, Scantranx allows you canto import themcustomer data from a CSV asfile. follows:This is useful when migrating from another system or uploading bulk customer lists.
1.To import customers:
-
Go to the Customers
tab.tab from the main navigation menu. -
2.onChoose File and select the CSV file containing your customer data. -
3.ClickHitthe Import Customer.button to upload and process the file.
Tip: Before importing, ensure your CSV file follows the required format — including column headers such as Name, Email, Phone Number, and Address — to avoid errors during upload.

All the customers will be added to the database.
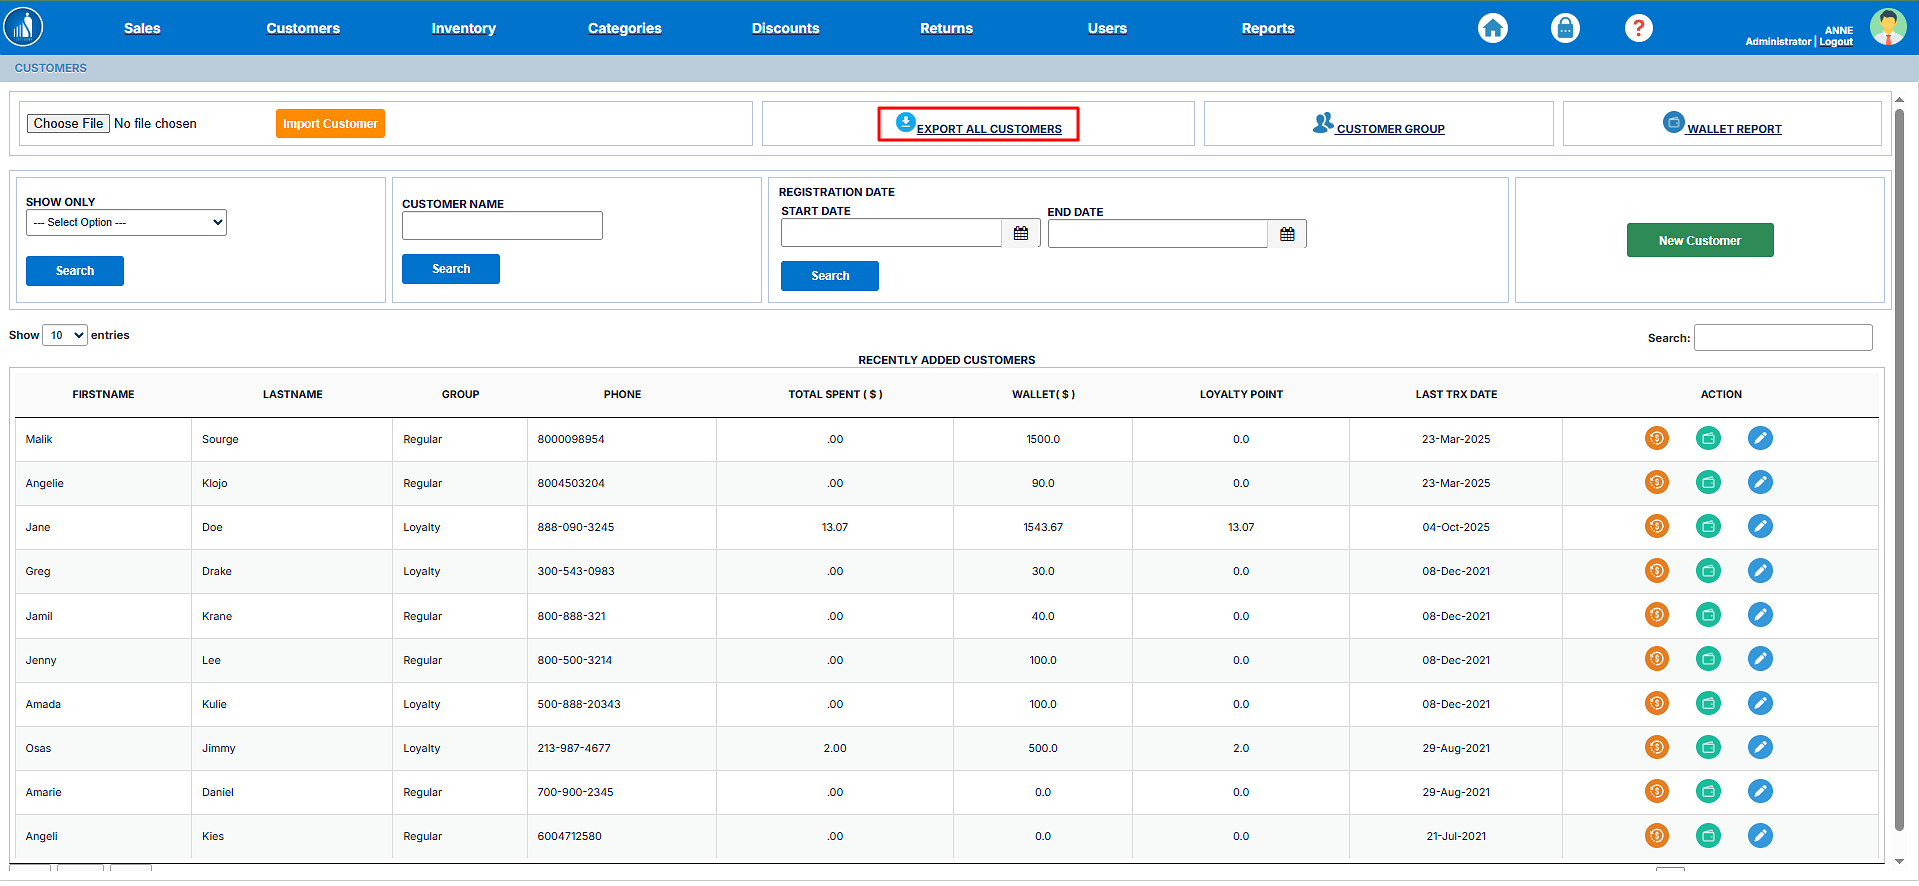
Exporting Customers
YouScantranx canallows you to export your customer data for recordkeeping, marketing campaigns, or data backup purposes.
To export customers:
-
Go to the
customersCustomersbytabclickingfrom the main navigation menu. -
Click the Export All Customers option.
-
The system will generate a file (in CSV or Excel format) containing all customer details.
-
Save the file to your computer for future use.
Tip: Regularly exporting customer data helps maintain a secure backup and enables you to analyze customer trends or use the data for targeted loyalty or email marketing campaigns.
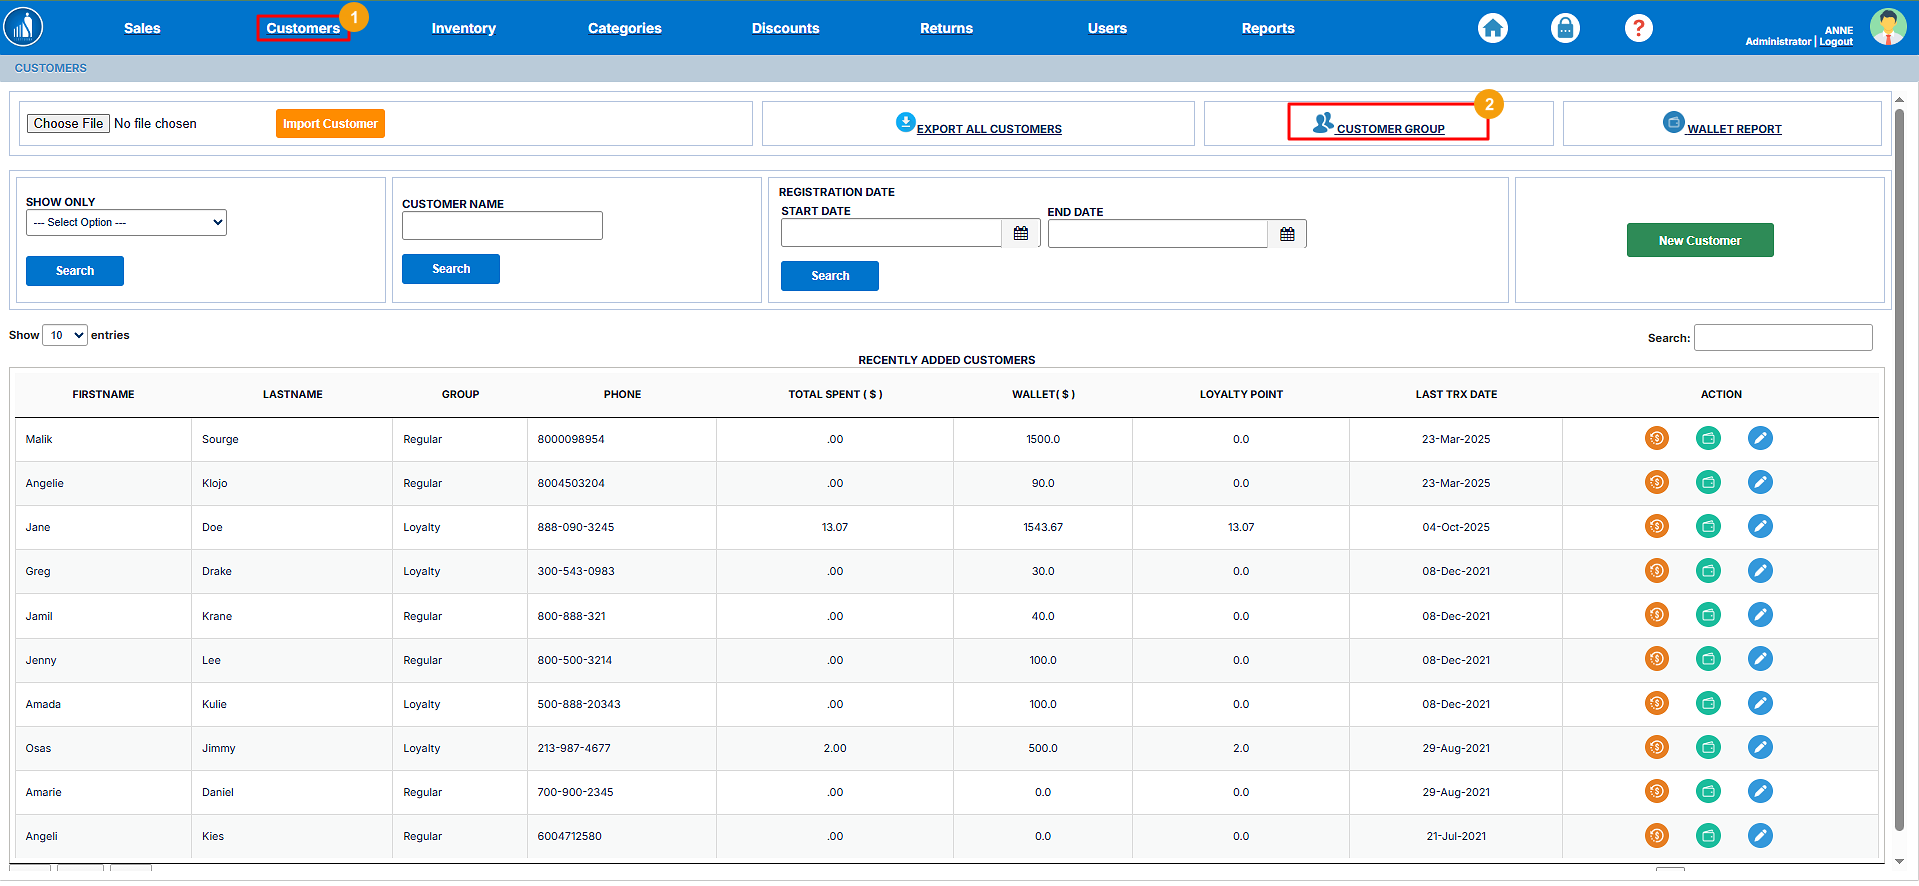
Setting Up the Customer Group
The Customer Groups feature in Scantranx allows you to categorize theyour customers into differentspecific groups.segments based on their purchase activity or engagement level. This helps in managing loyalty programs and offering targeted rewards or promotions.
By default, thereScantranx includes one main group — Loyalty — which is onlyautomatically one group, i.e., Loyalty. It categorizes the customersdivided into 3three subgroups:
-
Point-Based:
CustomersTheare grouped according to the number of loyalty pointsthetheycustomer hashave earned.This is the most commonly
used.used grouping method and helps reward repeat buyers. -
Amount-Based:
CustomersHowaremuchgrouped based on the total amountthespentcustomerathasyourspent.store over time. -
Visit-Based:
CustomersHoware categorized according to how many times they have visited and made purchases at your store.
Once a customer meets the customercriteria has visited the store.
Whenever the customer fulfilsfor any of these subgroups, the requirementssystem automatically assigns them to the appropriate group — no manual action is required.
Tip: Customer Groups make it easier to design personalized loyalty campaigns and identify your most valuable customers for
atargetedparticularpromotions.group,
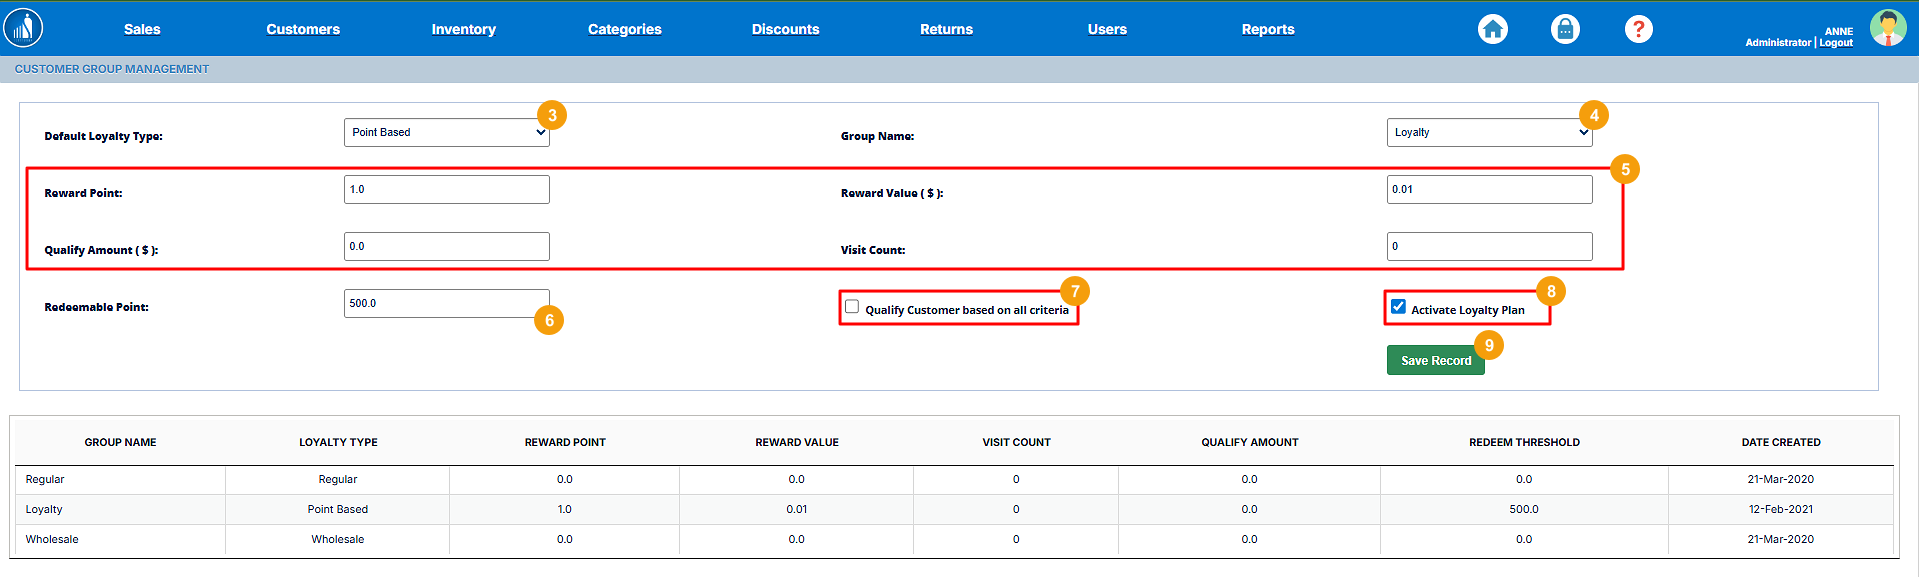
Steps to itSet automatically.Up a Customer Group
-
1.tab.tab from the main navigation menu. -
2.
-
3.loyaltyLoyaltytype.Type (Point-Based, Amount-Based, or Visit-Based). -
4.ChooseSelectthegroupGroupnameName (Byby default,Loyalty)Loyalty). -
5.Depending on the selected loyalty type:-
For
point-based,Point-Based, enter the Reward Points and Reward Value. -
For
amount-based,Amount-Based, enter theminimumMinimumamountAmount to be spent by thecustomercustomer.and -
visit-based,For Visit-Based, enter the
minimumMinimum Number of Visits required.
for -
-
Specify the Redeem Points — the number of
visits.points customers can use for discounts or rewards. -
must6.ChooseSpecifywhether theredeemcustomerpoints.7.meetSelectallif you want the clientcriteria to qualify forathegroup based on all criteria.group. -
8.deactivateDeactivate the loyaltypoints.group as needed. -
9.HitClick Save Record.to finalize the setup.

Managing Loyalty Points
The Loyalty Points feature in Scantranx allows you to reward repeat customers based on their purchasing behavior. This feature automatically tracks points earned and redeemed, encouraging customer retention and long-term engagement.
Customers accumulate points whenever they make qualifying purchases, and those points can later be redeemed for discounts or rewards at checkout.
Earning Loyalty Points
When a sale is processed:
-
The system automatically calculates loyalty points based on the settings configured in the Customer Group.
-
Points are assigned to the customer’s account after a successful transaction.
-
The accumulated points can be viewed under the Customer Profile in the Customers tab.
Example: If a store sets 1 point for every $1 spent, a $50 purchase will add 50 points to the customer’s account.
Redeeming Loyalty Points
Customers can redeem their accumulated points during checkout as part of the payment process.
To redeem points:
-
Open the POS and select the customer for the transaction.
-
On the checkout screen, click Apply Loyalty Points.
-
Enter the number of points the customer wishes to redeem.
-
The equivalent reward value is deducted from the total bill.
-
Complete the transaction normally.
Note: The redemption rate and rules (e.g., minimum points required, redemption limits) are defined in the Customer Group setup.
Viewing Loyalty Points Balance
To check or verify a customer’s loyalty points:
-
Go to the Customers tab.
-
Locate and select the customer’s profile.
-
Under the Loyalty Points section, view the total points earned, redeemed, and remaining balance.
Tip: Reviewing loyalty balances regularly helps identify your top customers and tailor special offers or rewards to strengthen customer relationships.
How to Search a Customer?Customer
Scantranx makes it easy to locate a specific customer or group of customers using various search filters. You can quickly find customer details for review, updates, or loyalty tracking.
You can search for a customer byby:
-
Group: Filter customers based on their assigned loyalty or
registrationcategorydate.group. -
Name: Enter the customer’s first or last name in the search bar.
-
Registration Date: Locate customers based on when they were added to the system.
Search by Group
-
1..from the dropdown menu. -
2.HitClick Search. -
The list of customers belonging to the selected group will appear.
Tip: Use this option to quickly view customers who qualify for specific loyalty tiers or promotional segments.

Search by Name
-
1.customerCustomername.Name in the search field. -
2.HitClick Search. -
The system will display all customers matching the entered name.
Tip: You can enter either the first name, last name, or a partial name to find results faster.

Search by Registration Date
-
1.registrationRegistrationstartingStartingdate.Date. -
2.registrationRegistrationendingEndingdate.Date. -
3.HitClick Search. -
The system will display all customers registered within the selected date range.
Tip: This option is useful for tracking newly registered customers during specific campaigns or onboarding periods.

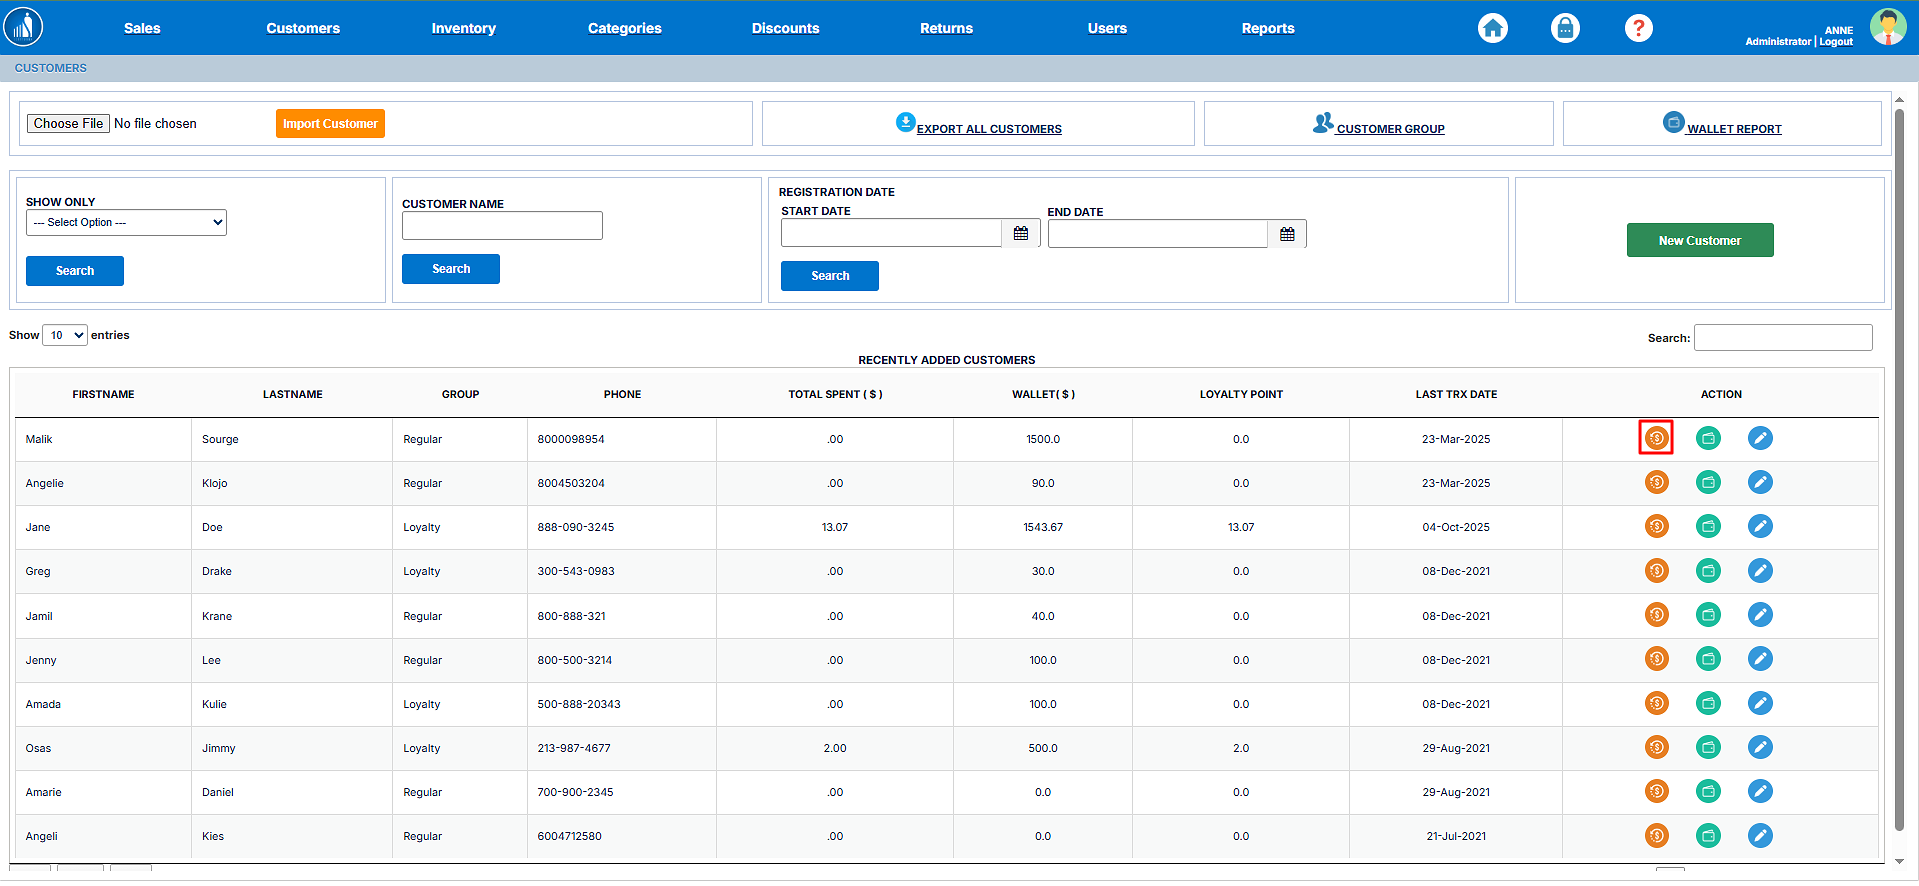
View Customer Transaction History
Scantranx allows you to view a customer’s complete transaction history to track their purchase patterns, spending behavior, and loyalty activity. This helps store owners and managers make informed decisions about rewards, promotions, and customer service.
To view a customer’s transaction history:
-
Go to the Customers tab.
-
Locate the customer whose transactions you want to view.
-
Click on the $ (Dollar) icon next to the customer’s name.
-
The system will display all past transactions associated with that customer, including order dates, amounts, and payment methods.
Tip: Reviewing customer transaction history
ofregularlyahelpscustomer,identifyclickhigh-value customers and tailor loyalty rewards or personalized promotions based onthetheir$purchasingicon.behavior.
View Customer’s Wallet
Each customer in Scantranx has a digital wallet that tracks their store credit, refunds, and loyalty redemptions. The wallet balance can be used for future purchases or as part of the payment during checkout.
To view thea customer’s wallet,wallet:
-
Go to the Customers tab.
-
Locate the customer whose wallet you want to view.
-
Click on the Wallet
icon.icon next to the customer’s name. -
The system will display the customer’s current wallet balance, along with the history of credits and debits.
Tip: Use the wallet feature to issue store credits instead of cash refunds — it encourages customers to make repeat purchases and stay engaged with your business.

Edit Customer Details
ToYou modifycan easily update or correct customer information such as name, contact details, followor theseaddress steps:directly from the Customers tab. This ensures that your customer database remains accurate and up to date.
1.To edit customer details:
Tip: Keeping customer details current helps improve communication, ensures accurate receipts, and supports loyalty tracking and marketing campaigns.
Would you like me to continue with Delete Customer Record next?
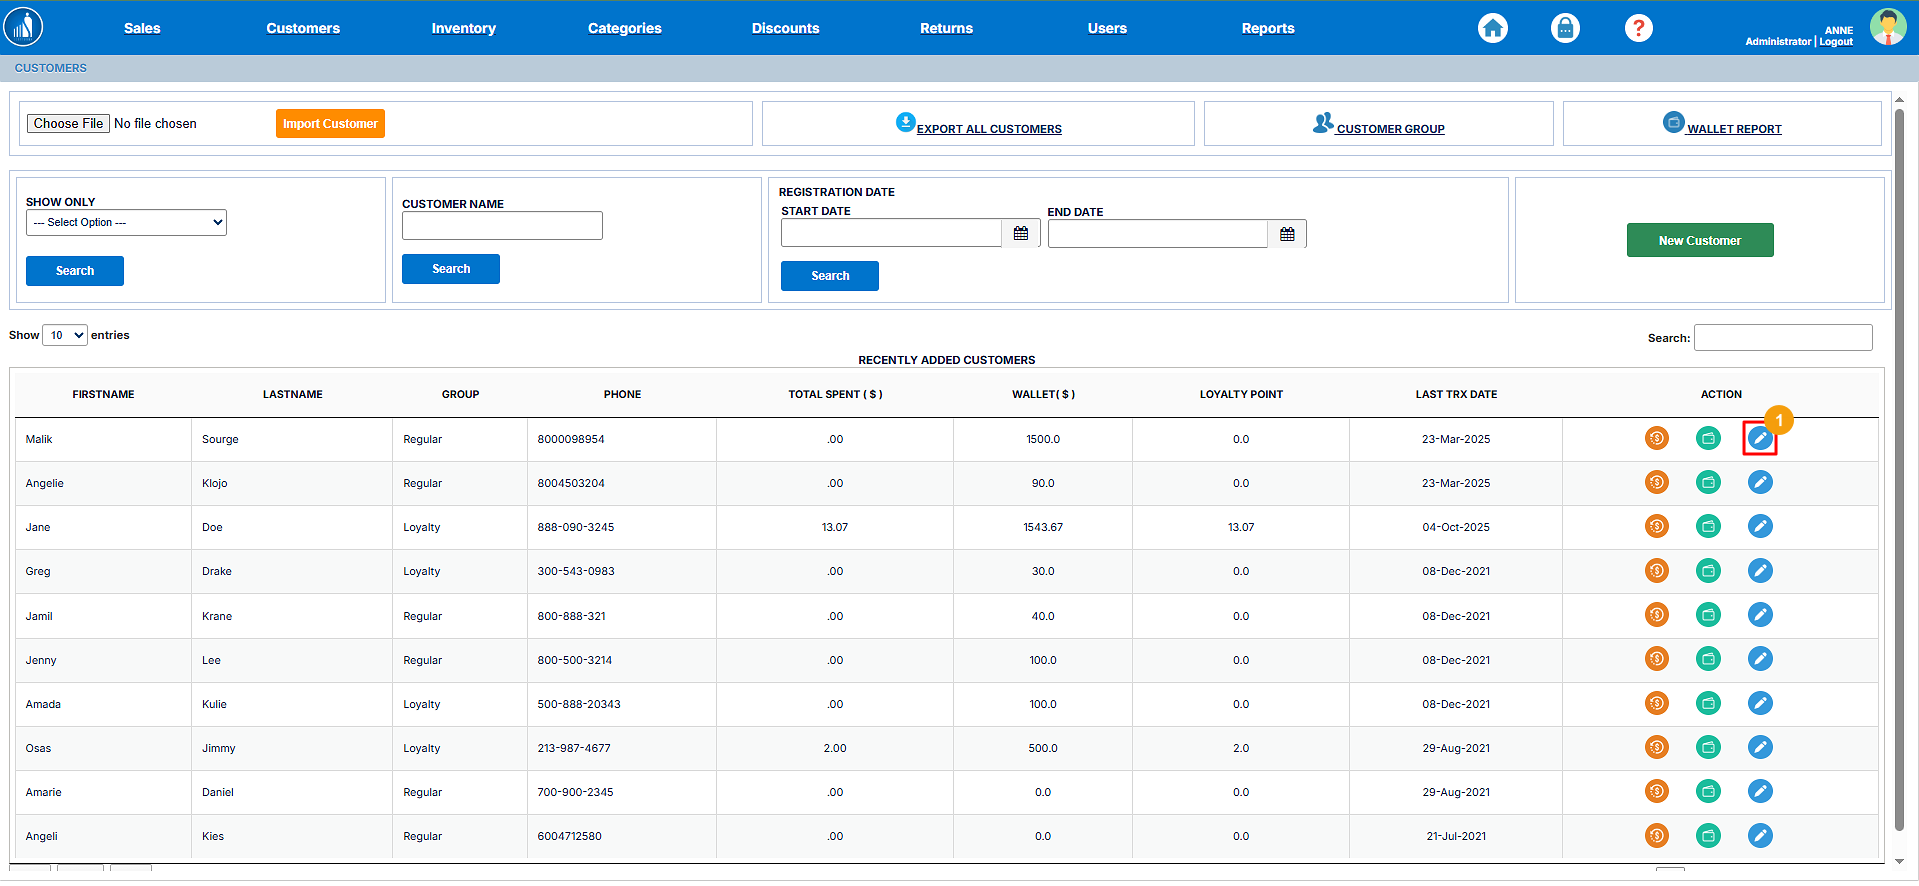
2. Make changes to the record.
3. Hit Save Record.
