Settings
Under the Settings tab on Dashboard,the Dashboard, you can access and manage all configuration options for your business,Scantranx store,system. inventory,This location,section tax,allows you to customize how your business operates — from store details and allinventory otherpreferences settings.to tax rules and location management.
Through the Settings tab, you can manage:
-
Business Settings: Update company information and contact details.
-
Store Settings: Configure operating hours, payment methods, and POS preferences.
-
Inventory Settings: Adjust stock management options and default units.
-
Location Settings: Add or edit store locations and assign users.
-
Tax Settings: Set up tax rates, classes, and applicable rules.
Let’s explore each of these settings:settings in detail.
Tip: Review your settings periodically, especially after software updates or business changes. Keeping your configurations current ensures smooth operations and accurate data across all modules.
Business Information Settings
Tip: Review your settings periodically, especially after software updates or business changes. Keeping your configurations current ensures smooth operations and accurate data across all modules.
InThe thisBusiness tab,Information tab allows you canto add and manage your businesscompany’s information,essential suchdetails. asThis businessinformation name,appears logo,on address,sales city,receipts, invoices, and reports, ensuring your branding and contact information,details etc.are consistent across all customer-facing documents.
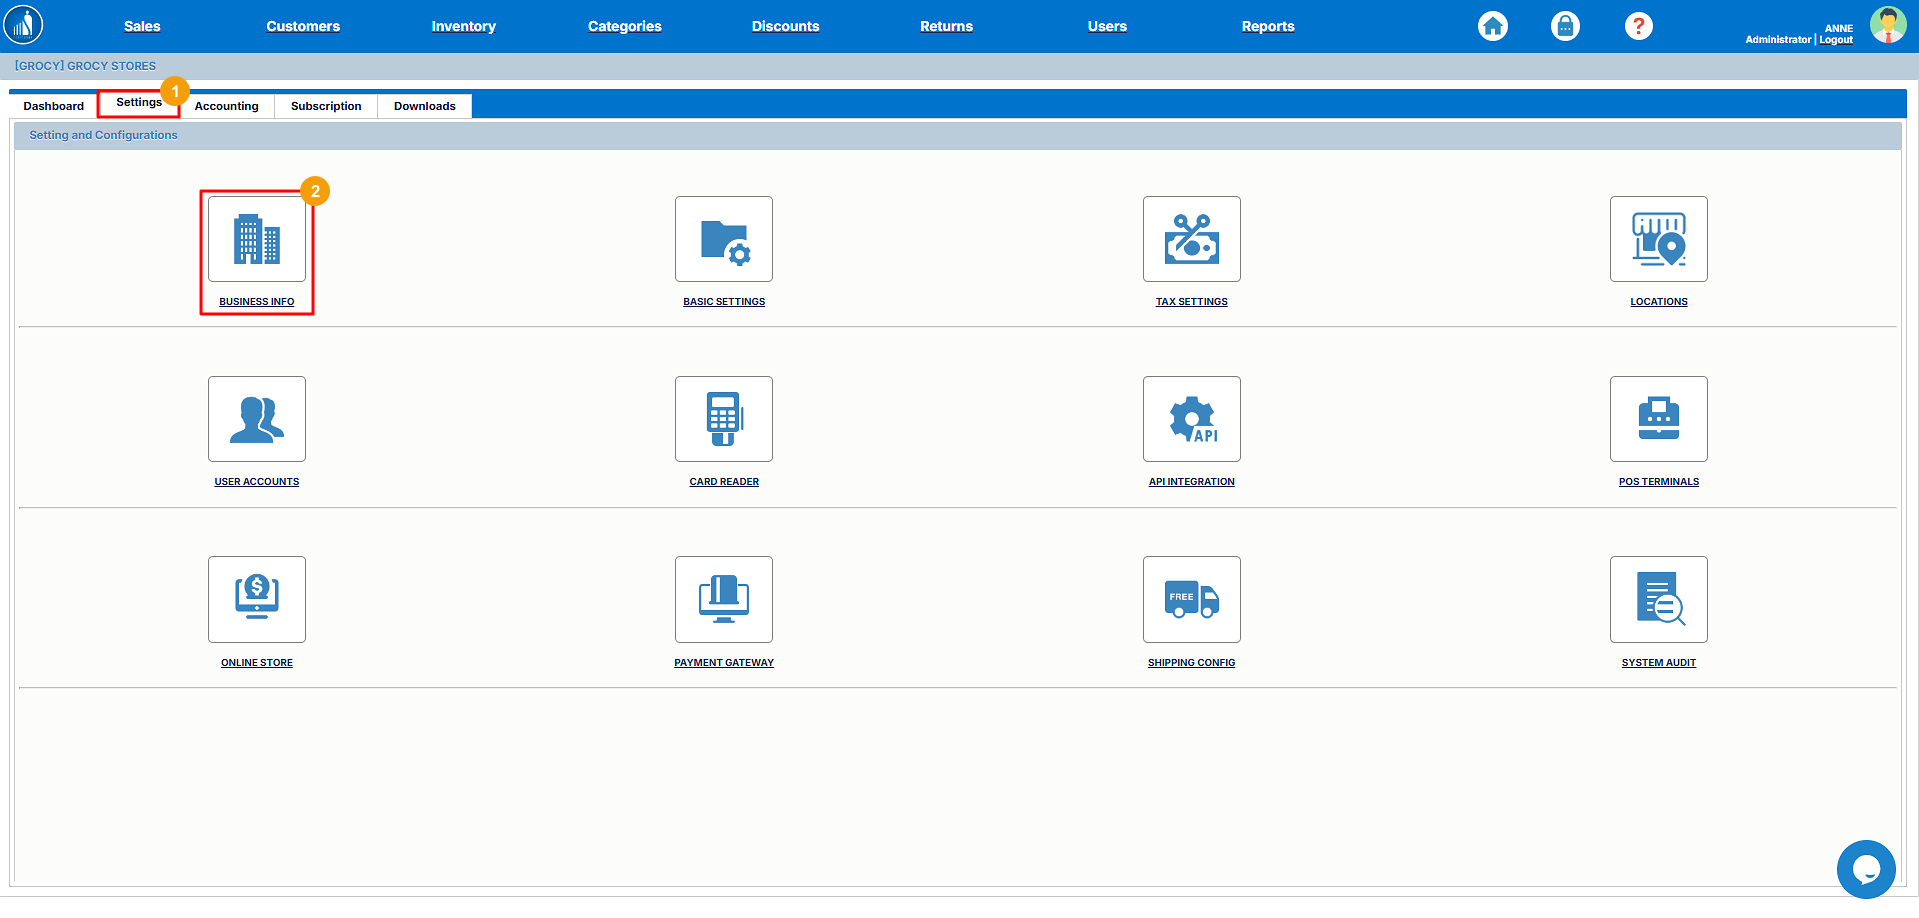
Add Business Information
1.You can enter or update your business details in the Business Info section under Settings. This information will appear on all receipts, invoices, and system-generated reports.
To add business information:
-
Switch to the Settings
.tab. -
2.
-
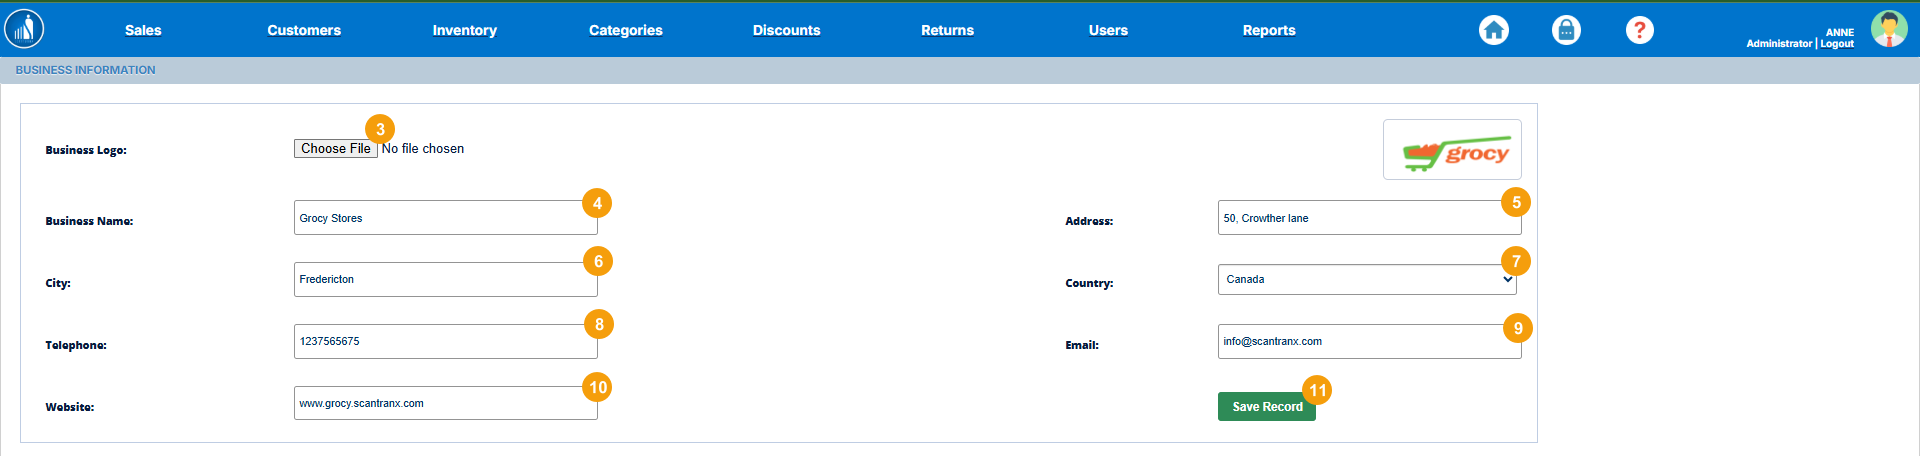
3.businessBusinesslogo.Logo. -
4.Enter thebusinessBusinessname.Name. -
5.Addbusinesstheaddress.Business Address. -
6.Enter thecity.City. -
7.Selectcountry.the Country. -
8.Enter thetelephoneTelephonenumber.Number. -
9.Addemail.the Email Address. -
10.Addwebsitethelink.Website Link (optional). -
11..to apply the changes.
Tip: Ensure your business details are accurate and complete. A professional logo and up-to-date contact information help reinforce brand credibility and improve customer trust.
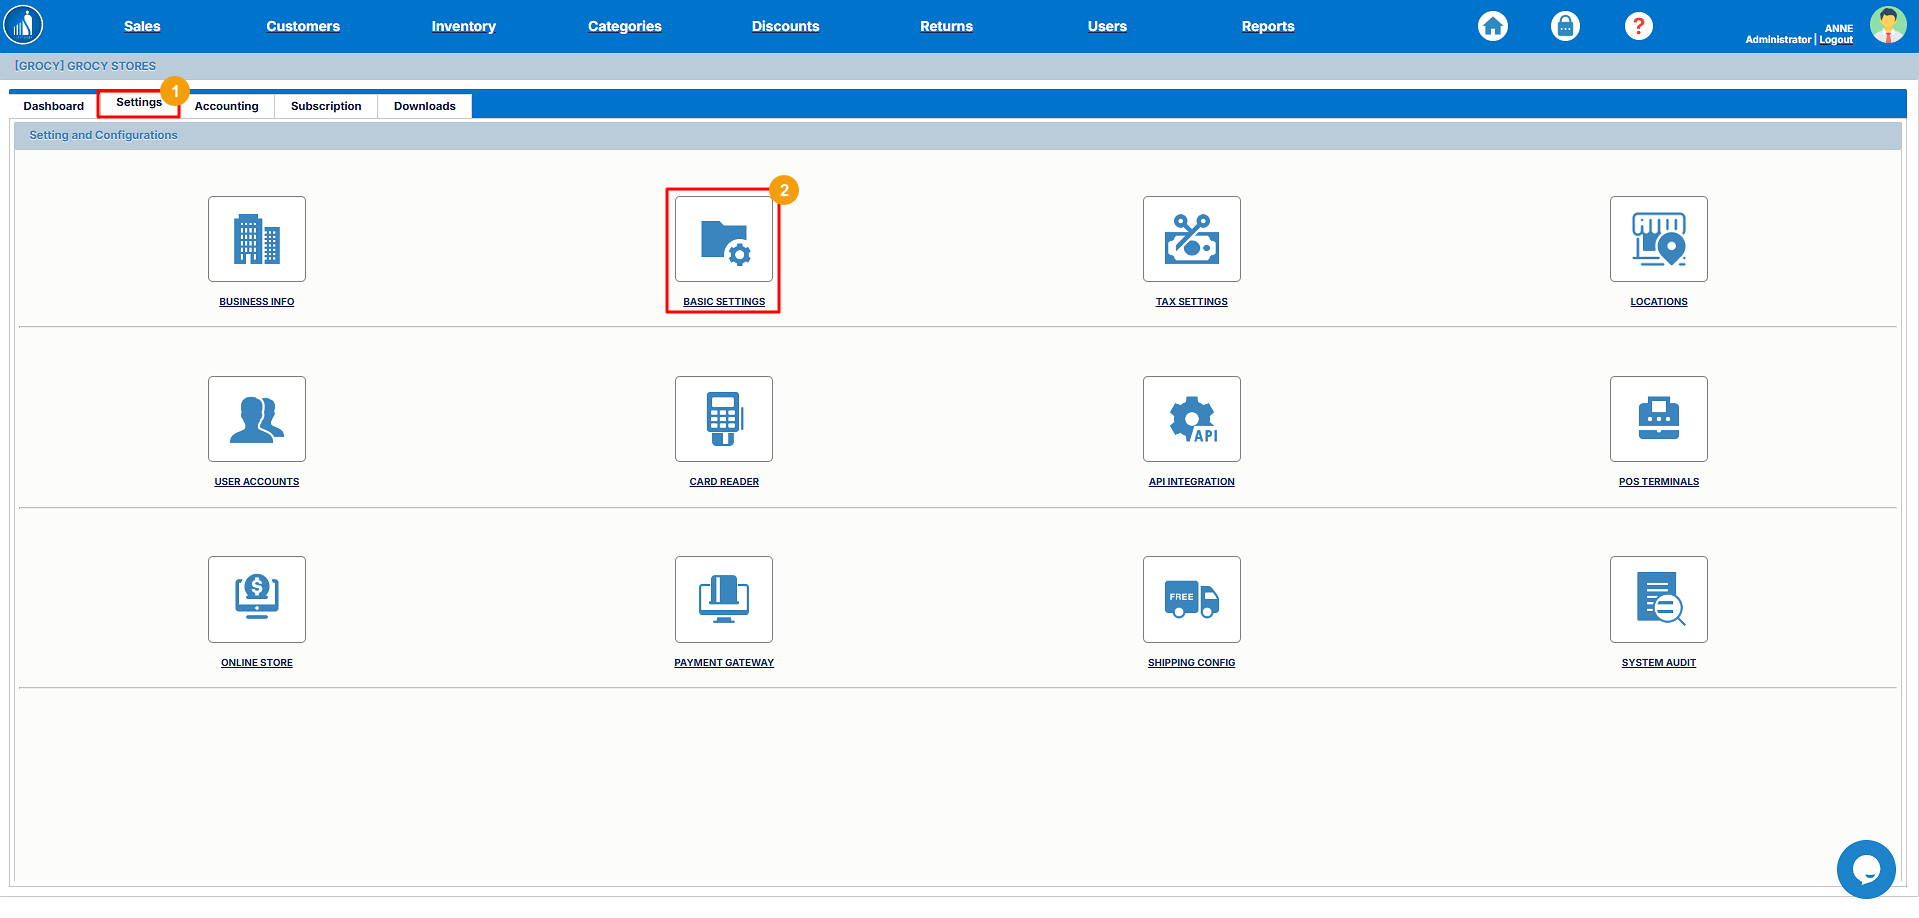
Basic Settings
The Basic Settings section allows you to configure the general settings for your business. These settings help customize your system according to your region, business type, and operational preferences.
Under the Basic Settings, you can adddefine key parameters such as:
-
Business Category: Specify the
generalindustrysettingsor type of business (e.g., Retail, Fashion, Electronics). -
Currency: Select your preferred currency for transactions and reports.
-
Time Zone: Choose the correct time zone to ensure accurate reporting and transaction timestamps.
-
Language (if applicable): Choose the language for your
business,interfacesuchandasreports.
Tip: Always set the
businesscorrectcategory,currencycurrency,and timezone,zoneetc.during initial setup. This ensures consistency in reports, pricing, and transaction data across all store locations.
Setting Up Basic Settings
1.You can configure the general preferences for your business under the Basic Settings section. These settings define how your system operates, displays information, and sends notifications.
To set up basic settings:
-
Go to the Settings tab.
-
2.
-
3.businessBusinesstype.Type (e.g., Retail, Restaurant, or Service). -
4.Choose the appropriate Time Zone. -
Select
ayourtimepreferredzone.Currency.5. -
6.notificationNotificationnumber.Number (used for system alerts or updates). -
7.notificationNotificationemail.Email to receive important notifications. -
8..to apply the changes.
Tip: Keeping your notification details up to date ensures that you don’t miss important alerts about transactions, stock updates, or system activities.


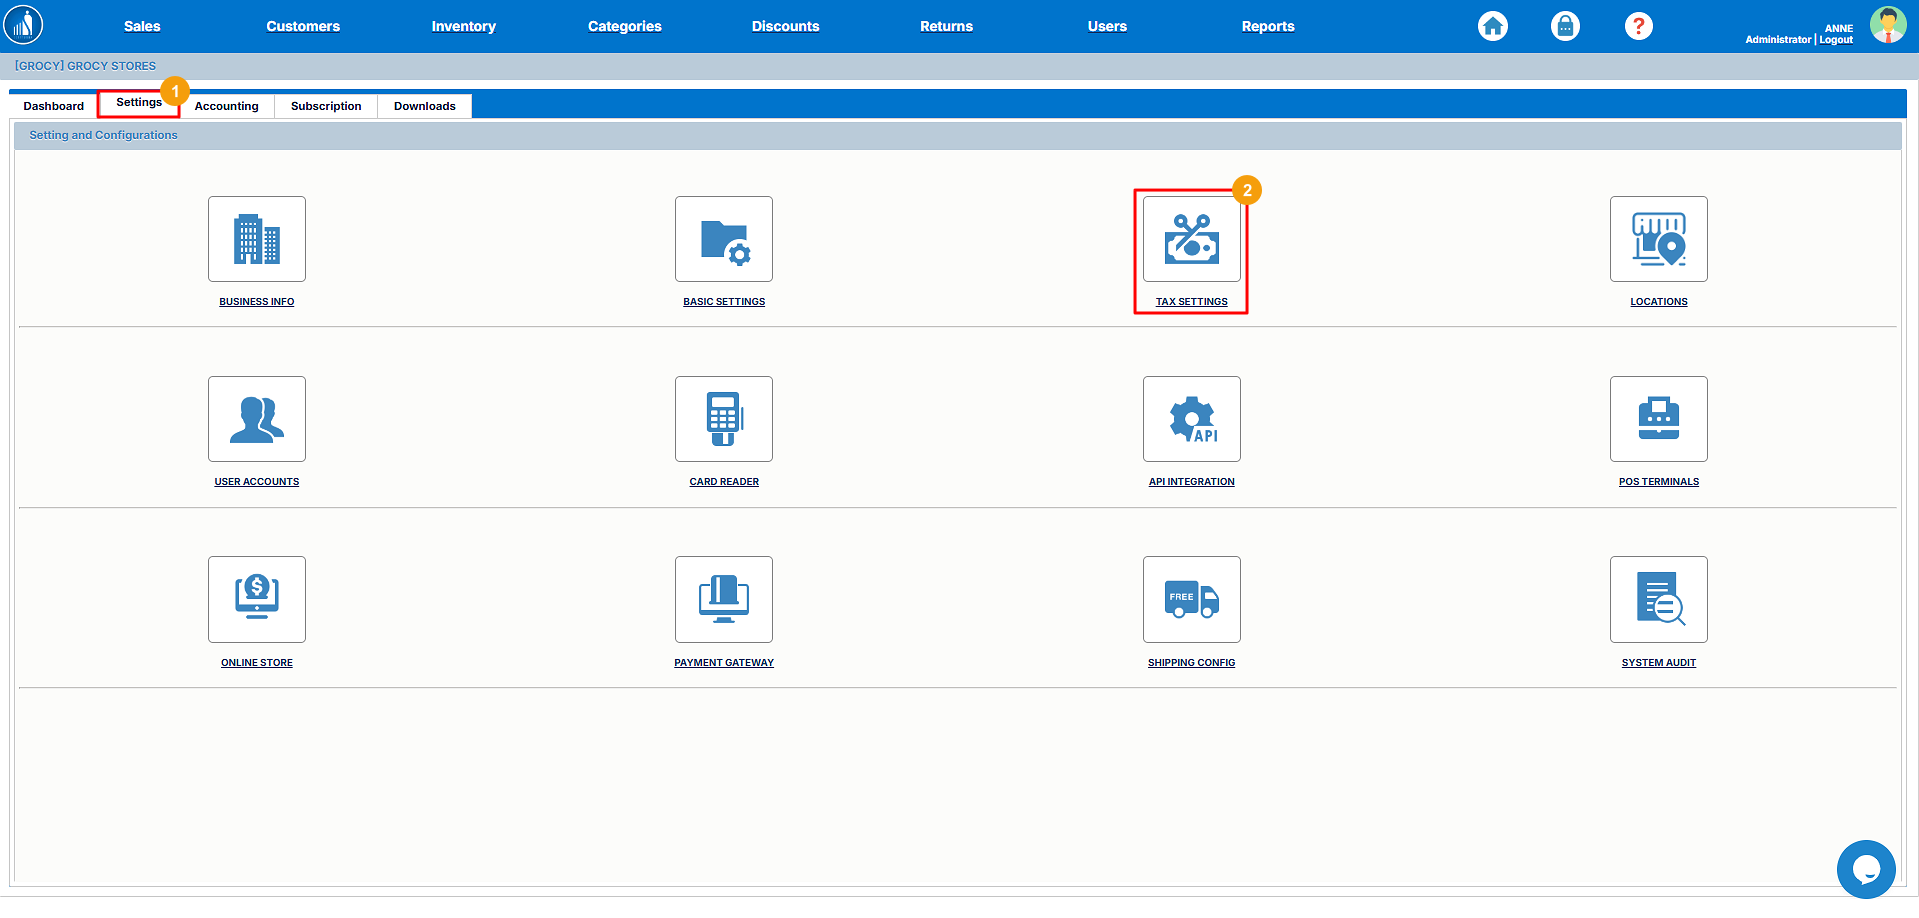
Tax Settings
ThisThe optionTax Settings section allows you to add and manage tax information for your business. Configuring taxes correctly ensures that all sales transactions, invoices, and reports reflect accurate tax calculations based on your local regulations.
Through this section, you can:
-
Add one or multiple tax types (e.g., VAT, GST, Sales Tax).
-
Set tax rates according to your region.
-
Define whether taxes are included in prices or added at checkout.
-
Assign tax classes to specific products or categories.
Tip: Always verify your tax rates with your local tax authority or accountant to ensure compliance. Keeping tax settings accurate helps avoid reporting discrepancies and supports smooth accounting integration.
How to Add a New Tax?Tax
1.You can create and manage tax types applicable to your business from the Tax Settings section. Adding tax information ensures that the correct tax rate is applied automatically during sales transactions.
To add a new tax:
-
Go to the Settings tab.
-
2.
-
3.taxTaxname.Name (e.g., VAT, GST, or Sales Tax). -
4.taxTaxrateRate as a percentage. -
5.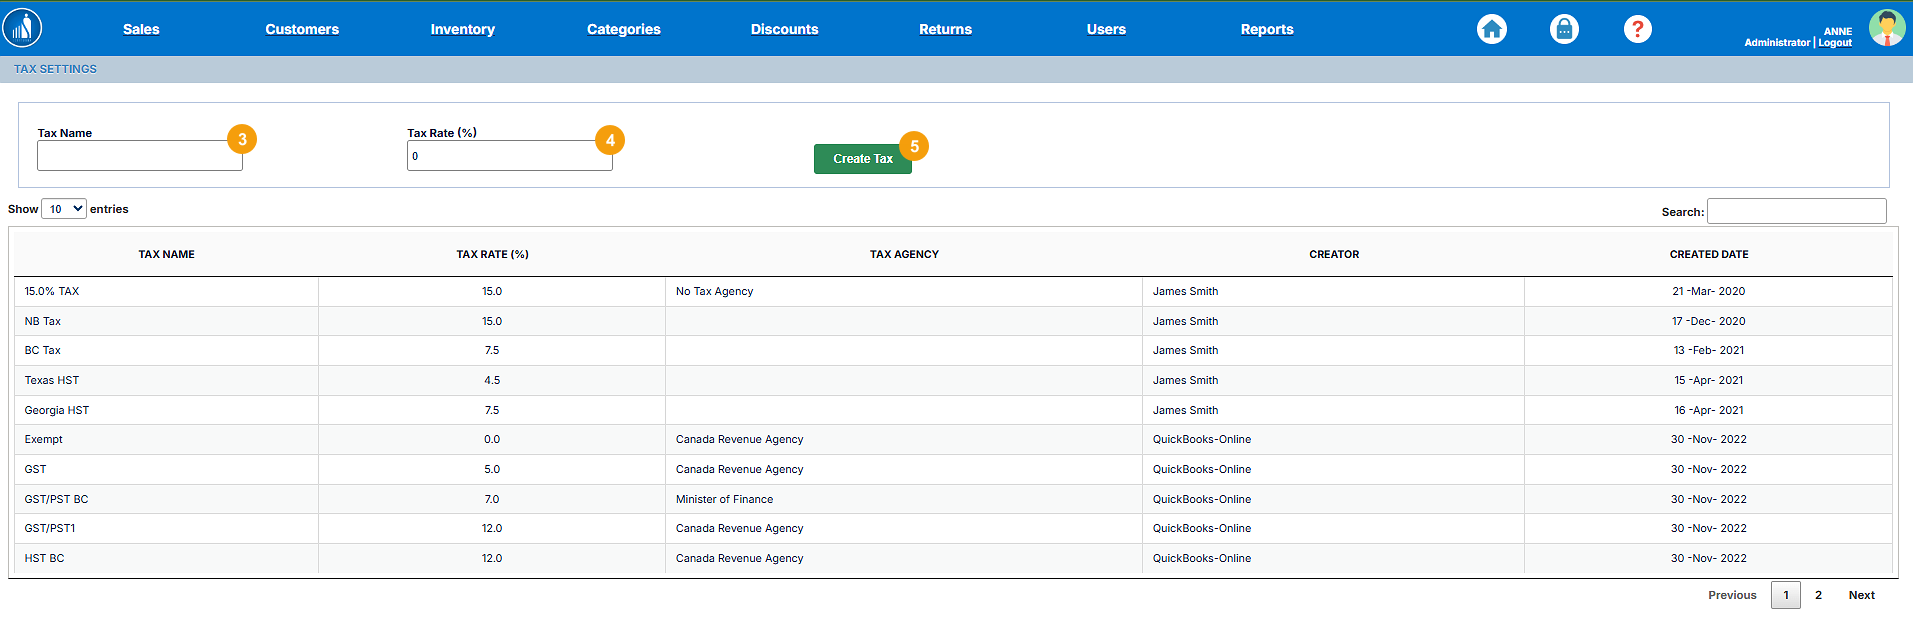
The new tax will be added to the table underneath.below. The table showsdisplays theall existing taxes along with their agency,Tax creator,Agency, Created By, and creationCreation date.Date for reference.
Locations
Tip: Use clear tax names and accurate percentages to avoid confusion during reporting. You can create multiple tax types if your business operates in different regions or requires combined tax calculations.
Tip: Use clear tax names and accurate percentages to avoid confusion during reporting. You can create multiple tax types if your business operates in different regions or requires combined tax calculations.

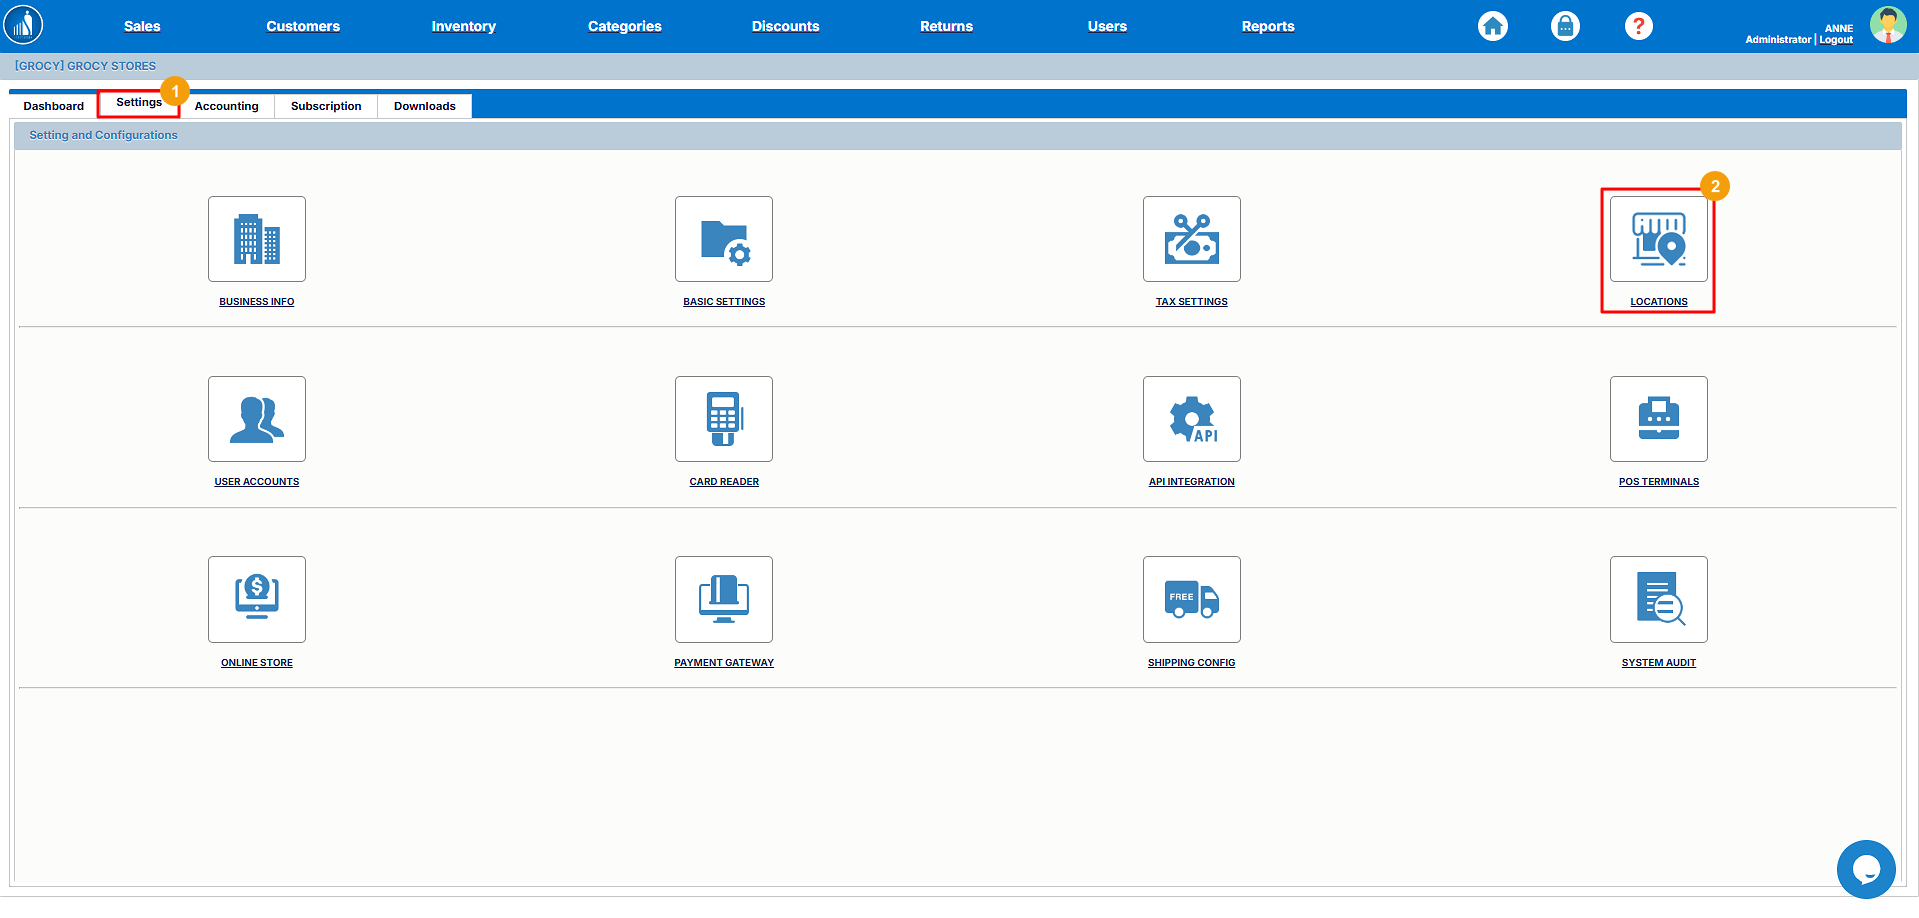
Location Settings
The LocationsLocation Settings issection whereallows you canto add newand locations or editmanage the existing ones. Thesedifferent locations refer to the areas where your business isoperates. available.Each location represents a physical store, warehouse, or branch. Configuring locations helps track sales, inventory, and users separately for each branch.
In this section, you can:
-
Add new locations as your business expands.
-
Edit existing locations to update contact details or addresses.
Tip: Setting up separate locations for each store or warehouse allows you to maintain accurate stock tracking, sales analysis, and employee management across multiple branches.
How to Add a New Location?Location
1.You can add new store branches, warehouses, or sales points directly from the Locations section under Settings. Each location can have its own users, inventory, and sales records for better tracking and reporting.
To add a new location:
-
Go to the Settings tab.
-
2.
-
3.
-
4.locationLocationID.ID. -
5.locationLocationname.Name. -
6.locationLocationaddress.Address. -
7.location city.City. -
8.postalPostalcode.Code. -
9.stateState orprovinceProvince for your branch. -
10..to save it.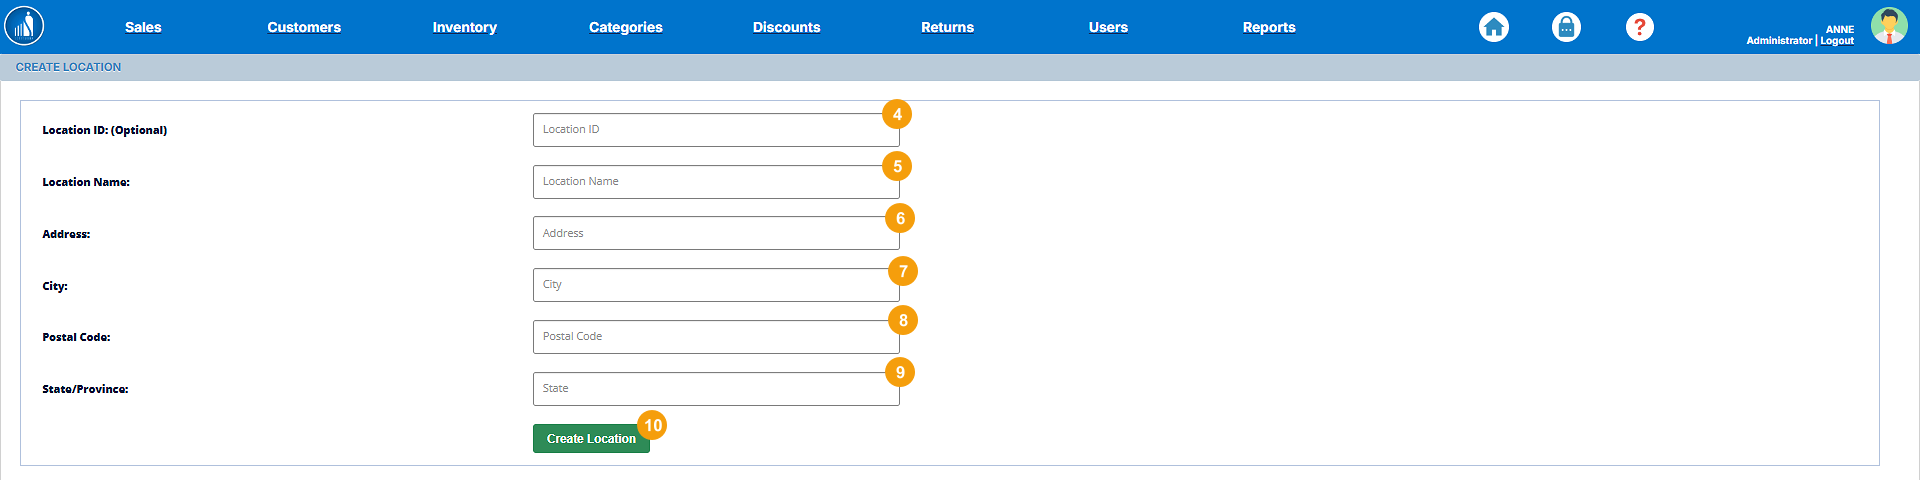
The new location will automatically start appearing inacross other tabs.modules, such as Inventory, Sales, and Reports, allowing you to manage operations by location.
Tip: Use clear and consistent naming for locations (e.g., Downtown Store, Warehouse A) to make reporting and management more organized.


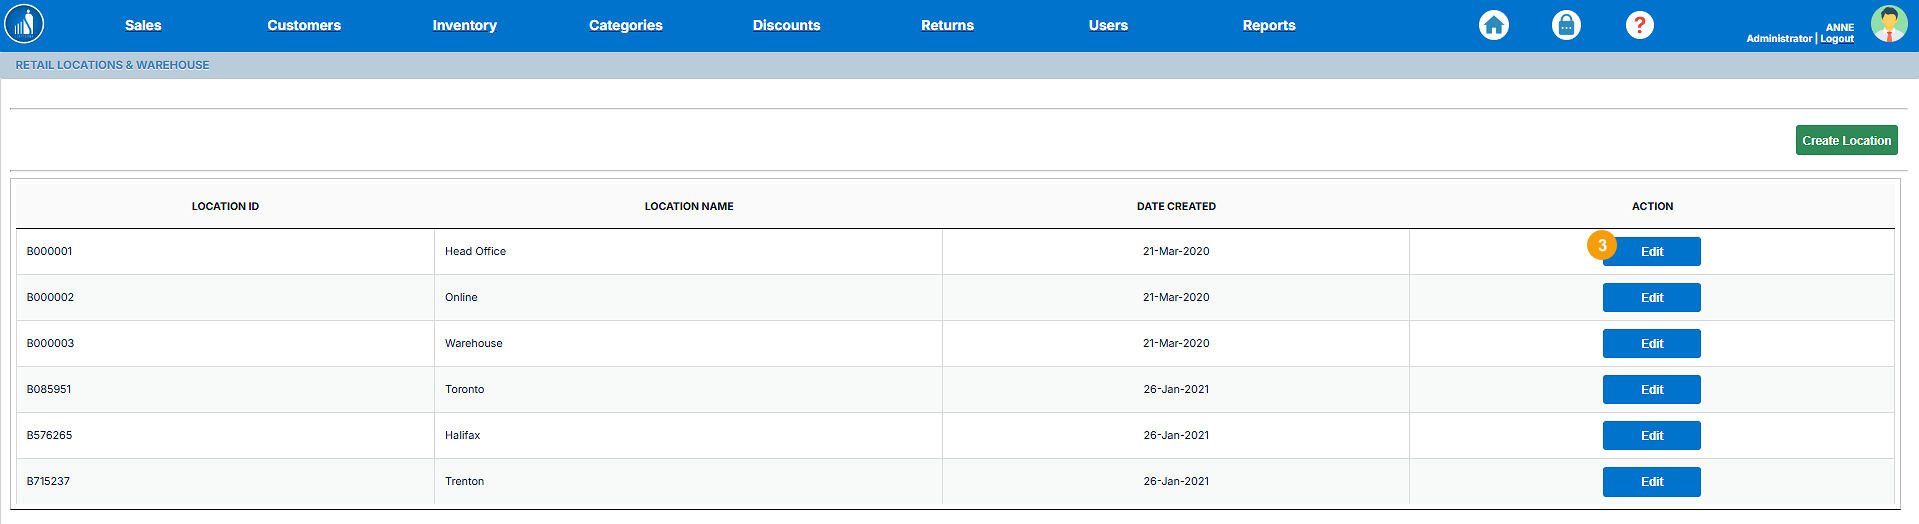
How to Edit Existing Locations?Locations
1.You can update details of existing store locations to keep your business information accurate. This is useful when a branch changes address, contact details, or other operational information.
To edit an existing location:
-
Go to the Settings tab.
-
2. -
3.beforenext to the location you want toedit.modify. -
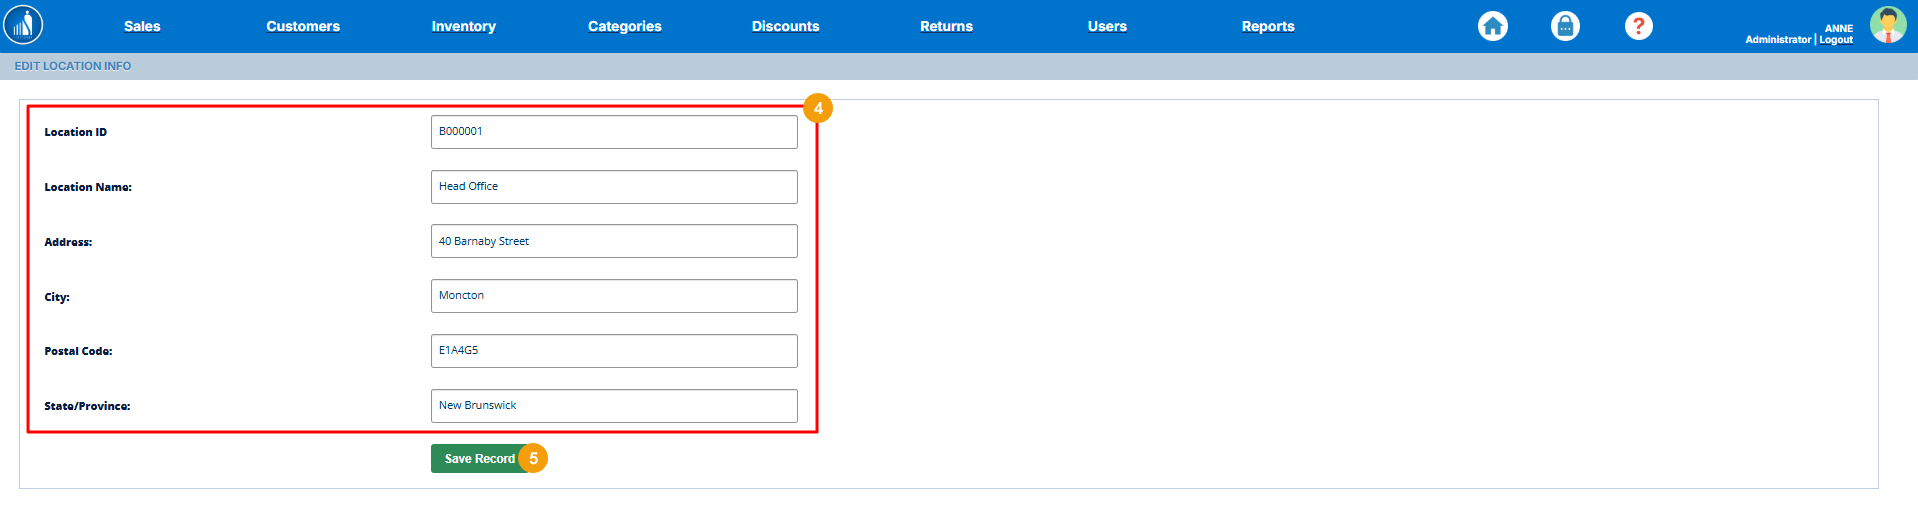
Make the necessary changes to the Location Details (e.g., name, address, city, postal code, or state).
-
Click Save Record to apply the updates.
Tip: Keep location details current to ensure accurate reporting and smooth coordination across branches. Updated information also reflects correctly on invoices, receipts, and internal reports.
4. Make changes to the location details.
5. Click Save Record.
User Accounts Settings
UnderThe thisUser section,Accounts you’llSettings findsection allprovides the same optionsfunctionality as the Users tab.tab on the main dashboard. It allows youadministrators to createcreate, edit, and manage user accounts, as well as define their roles and access permissions within the system.
From this section, you can:
-
Add new users and assign roles.
-
Modify existing user details or permissions.
-
Reset user passwords.
-
Deactivate or delete user accounts.
This section provides centralized control over all user-related configurations, ensuring that each employee has appropriate system access according to their roles.responsibilities.
Tip: Review user roles regularly to maintain system security and prevent unauthorized access to sensitive business data. Please refer to the Managing Users section for a detailed demonstration.
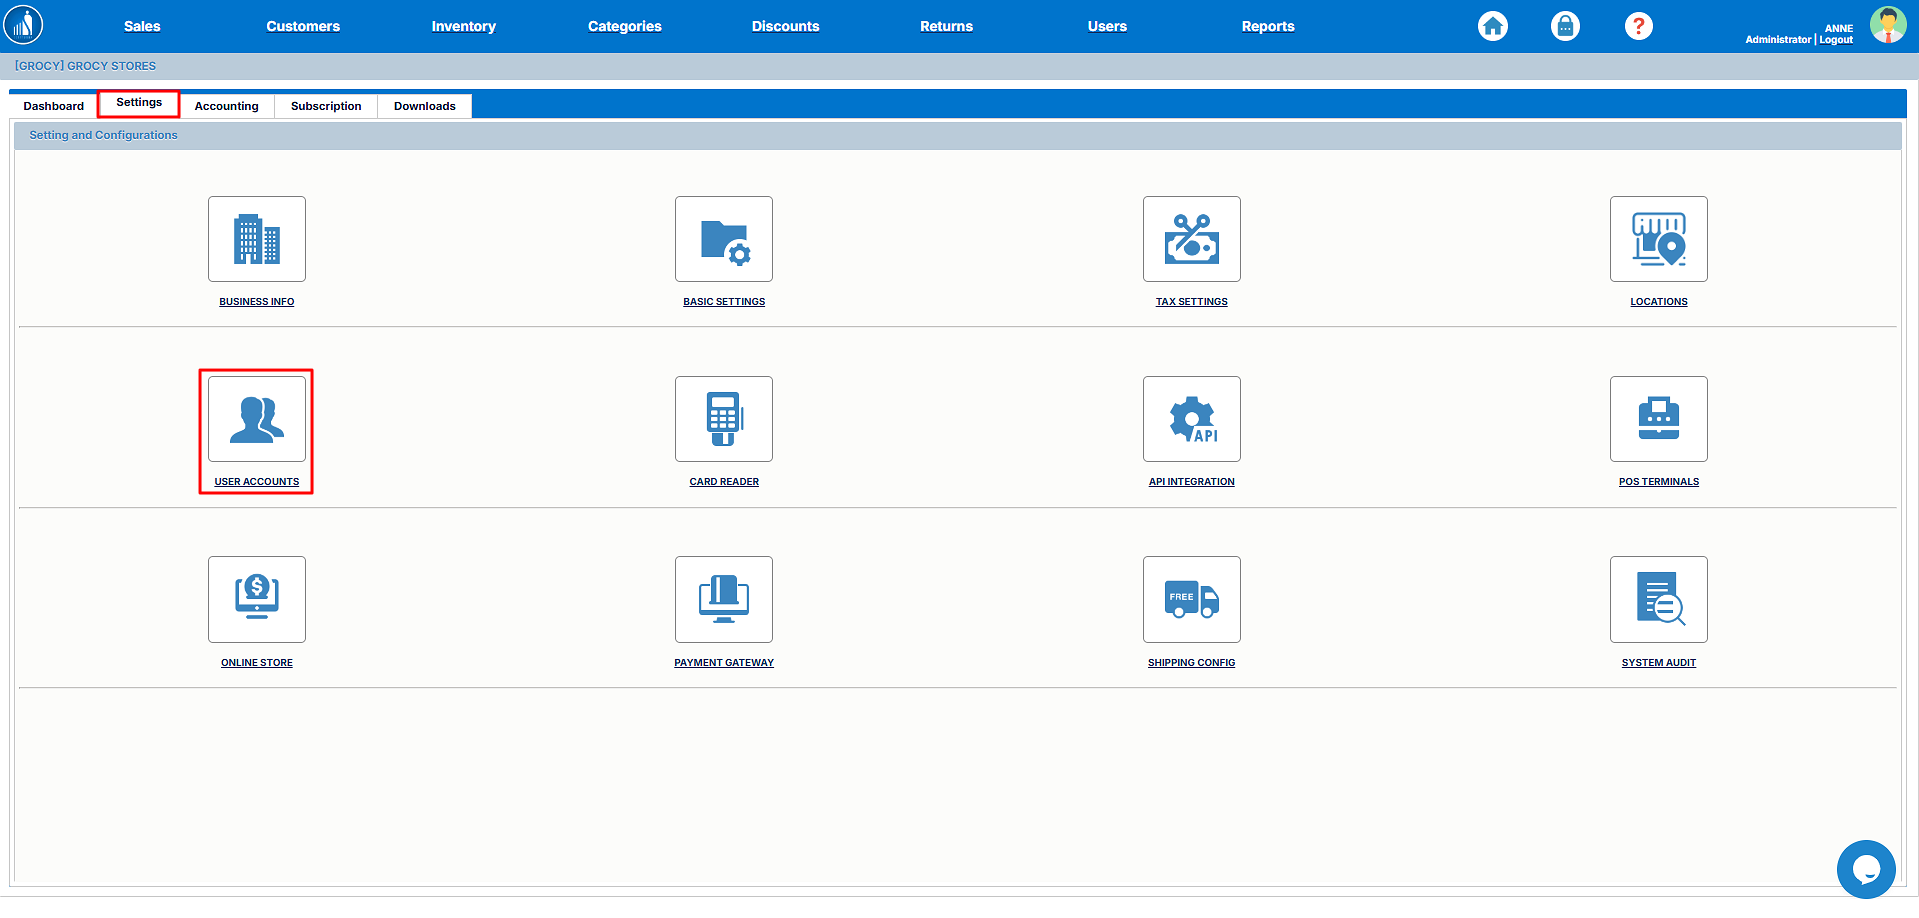
Card Reader Settings
TheseThe settingsCard allowReader Settings section allows you to set up and configure your card reader machines to accept card payments directly at the Point of Sale (POS). Proper configuration ensures smooth and secure transactions for your customers.
In this section, you can:
-
Connect supported card reader devices to your POS.
-
Configure payment gateway integration (e.g., Stripe, Elavon).
-
Set default payment modes for card transactions.
-
Test connectivity between the POS system and card reader.
Tip: Ensure your card reader
machinesis compatible with Scantranx and connected via USB, Bluetooth, or Wi-Fi (depending on the model). Always test the setup before processing live transactions toacceptavoidcardpaymentpaymentsdisruptions.at
How to Configure a New Card Reader?Reader
1.You can connect and configure a new card reader device under the Card Reader settings to enable secure and seamless card payment processing at your POS terminals.
To configure a new card reader:
-
Switch to the Settings tab.
-
2.
-
3.provider.Provider (e.g., Stripe Terminal, Elavon, or other supported gateways). -
4.
-
5.terminalTerminalID.ID provided by your payment processor. -
6.pairingPairingtoken.Token to link the device. -
7.athelocation.Location where the card reader will be used. -
8..to complete the setup.
The new card reader will now be configured.successfully configured and ready for use at the POS.
Tip: Always verify the pairing token and terminal ID with your payment provider to ensure secure integration. After configuration, perform a test transaction to confirm successful connectivity.

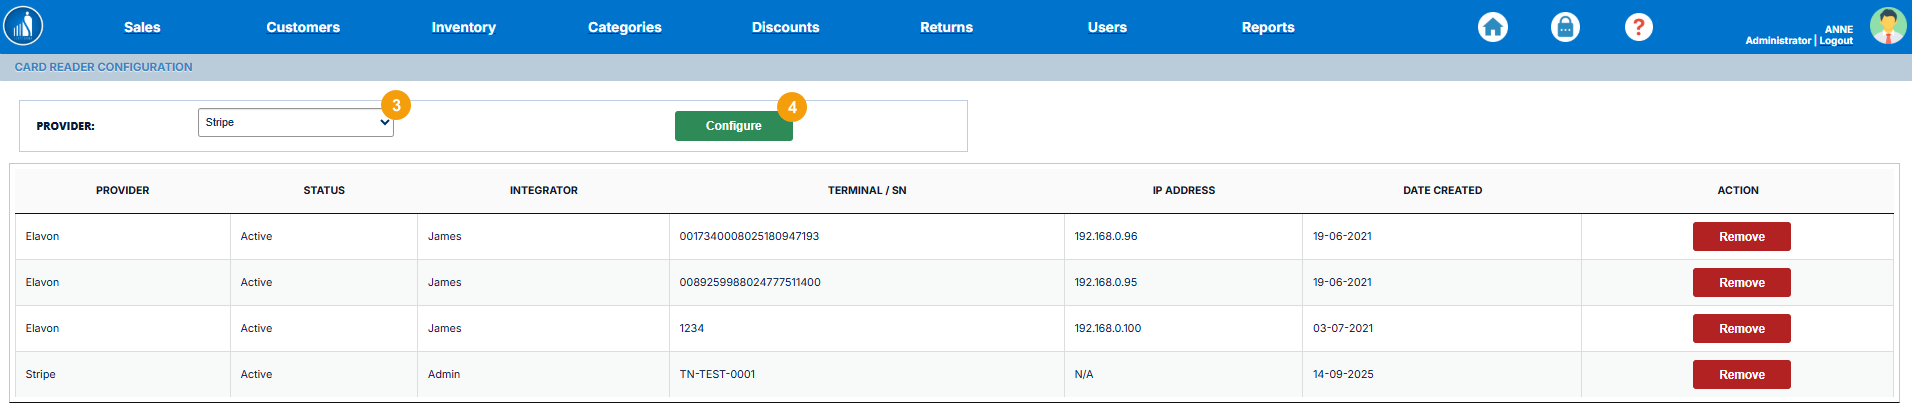

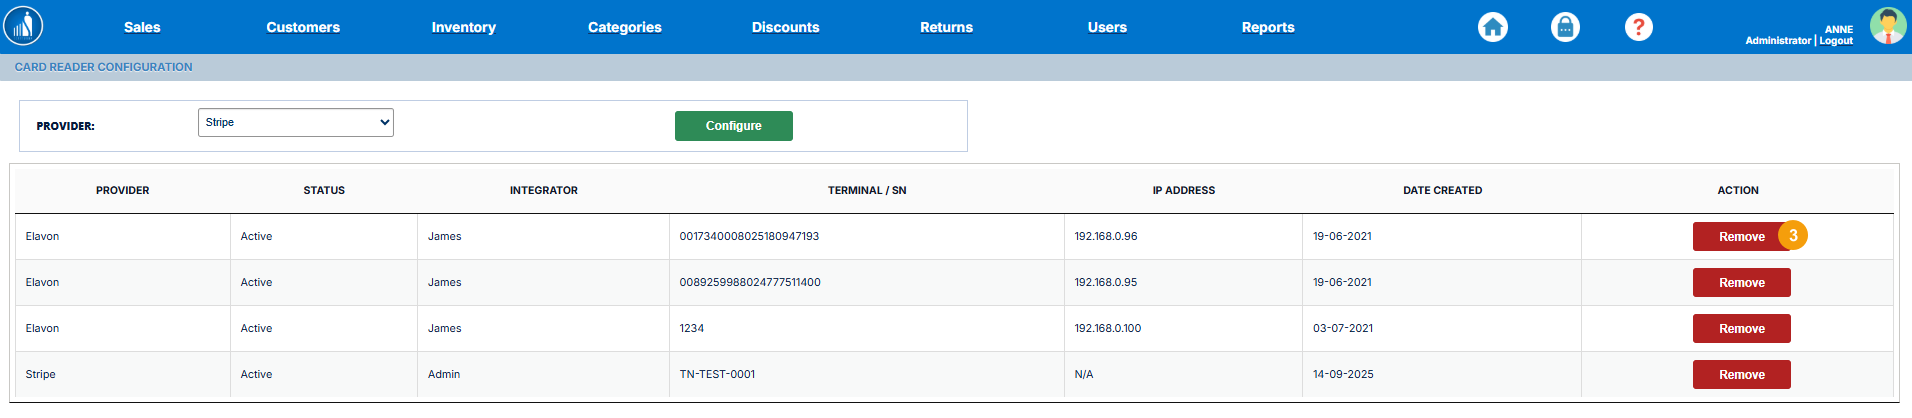
How to Remove an Existing Card Reader?Reader
1.If a card reader is no longer in use or needs to be replaced, you can easily remove it from the system through the Card Reader settings. This helps keep your connected devices list accurate and secure.
To remove an existing card reader:
-
Go to the Settings tab.
-
2. -
3.onnext to the card reader machine you wish toremovedisconnect.it.
The selected card reader will be removed from the system and will no longer be available for POS transactions.
Tip: Remove inactive or replaced card readers promptly to prevent connection errors and ensure that only authorized devices are available for payment processing.
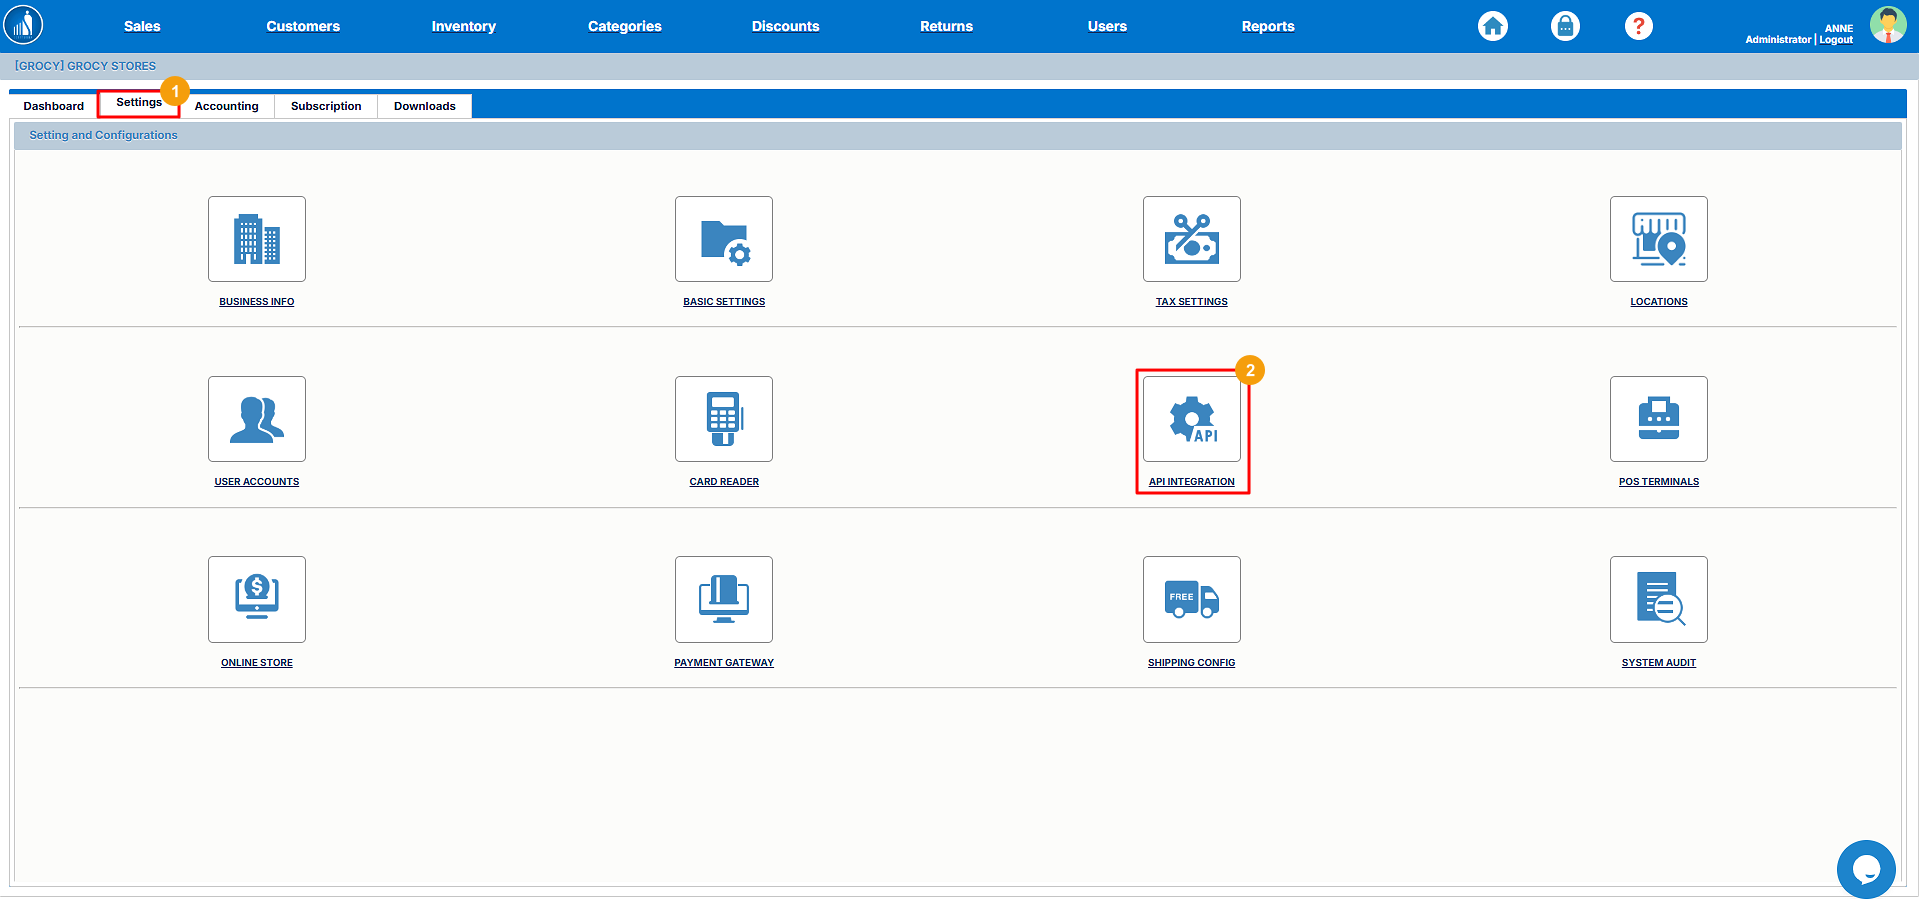
API Integration Settings
ScanTranx allows you to integrate third-party applications using API keys. You can generate a unique key for each application.
How to Generate an API Key?
1. Go to the Settings tab.
2. Click on API Integration.
3. Enter the client name.
4. Click Generate Key.
5. To view the key, click on the View link.

How to Revoke an API Key?
1. Go to the Settings tab.
2. Click on API Integration.
3. Click on the Revoke Key button.

The key will no longer be accessible to the client.
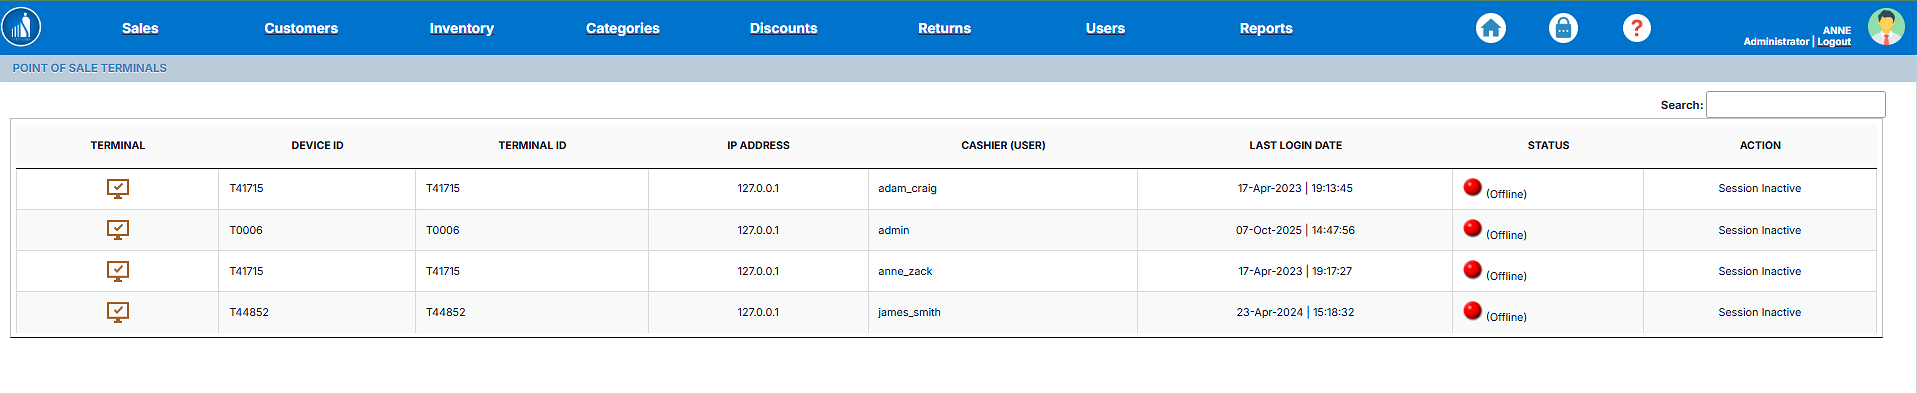
POS Terminals
You can view all the configured POS terminals under the POS Terminals settings.
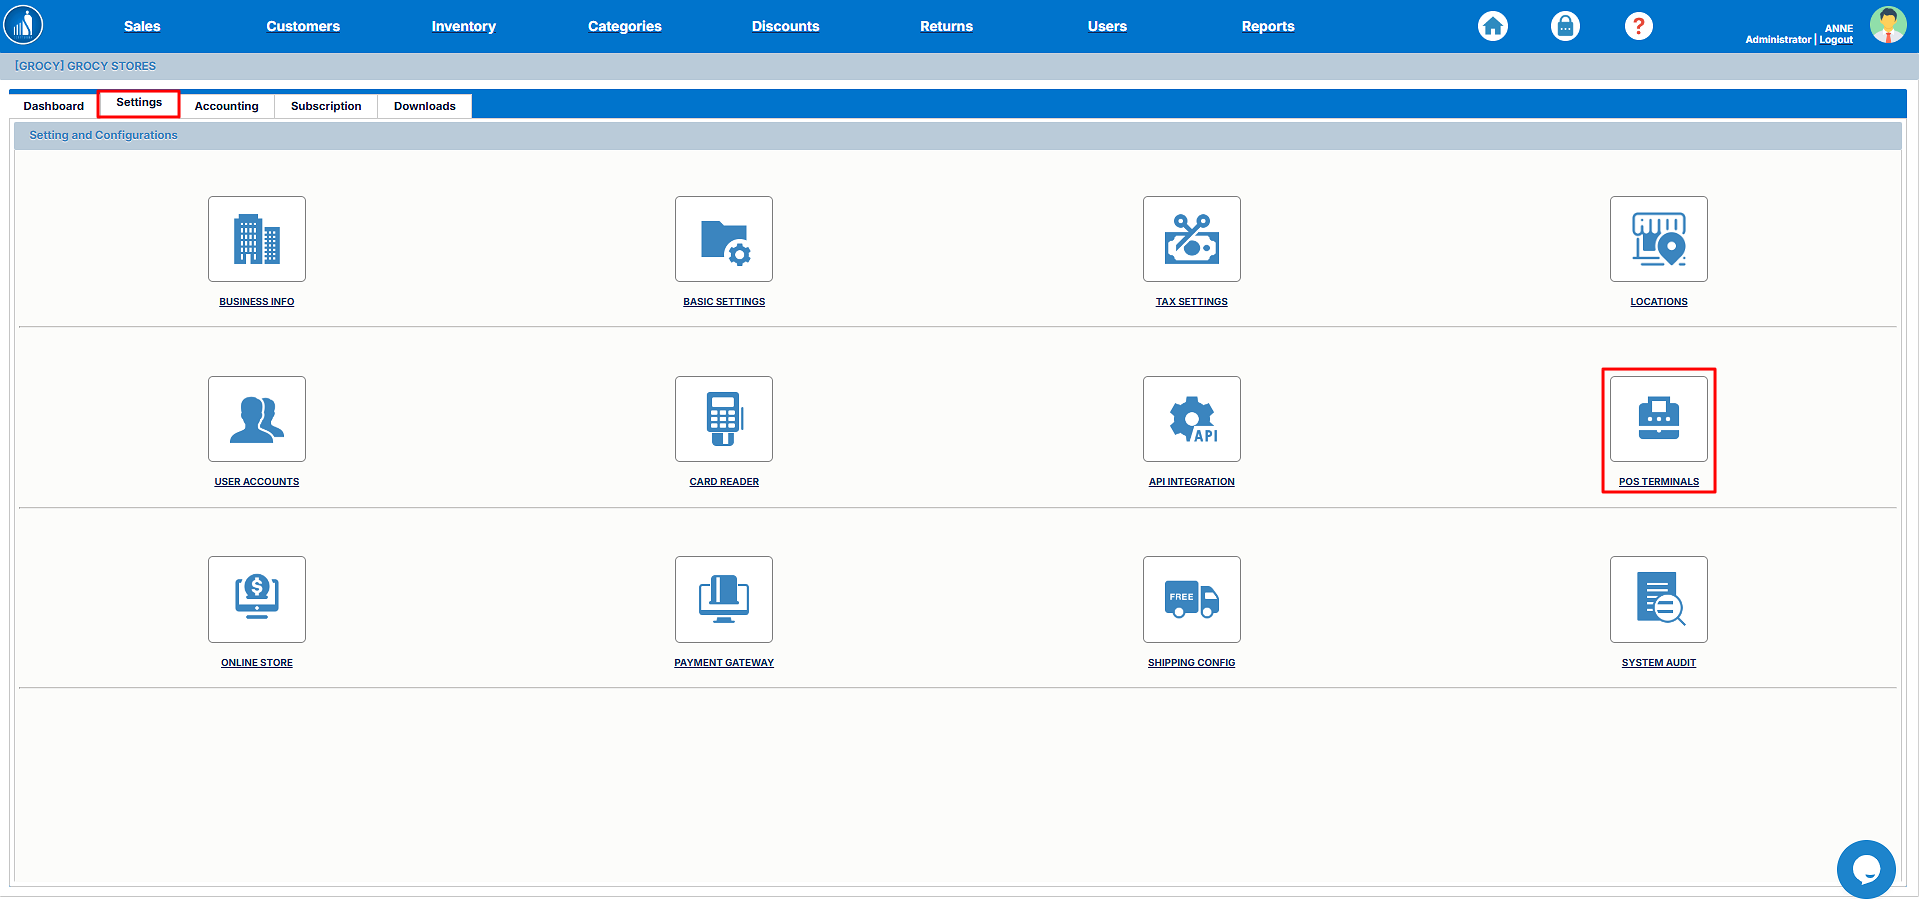
It allows you to monitor which terminal is currently online, as well as the last login date.
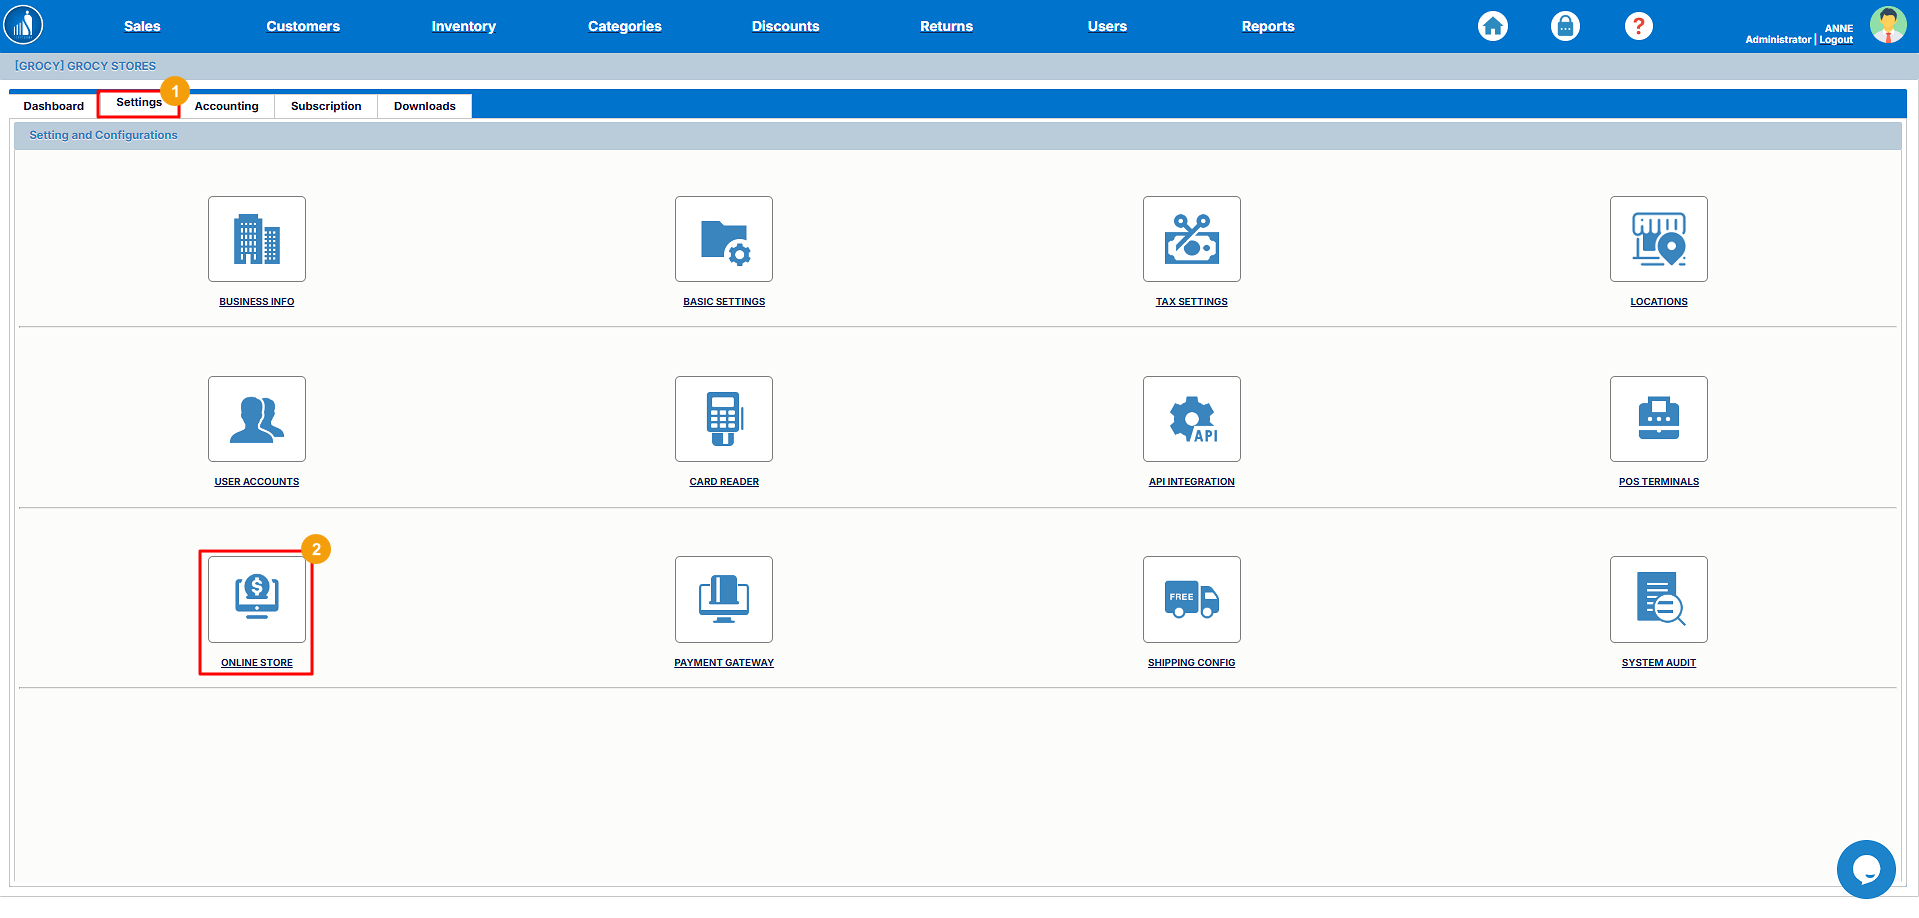
Online Store Settings
The Online Store settings allow you to configure and manage your online store. You can set up the look and feel of your store from this tab.
How to Set up the Online Store?
1. Go to the Settings tab.
2. Select Online Store.
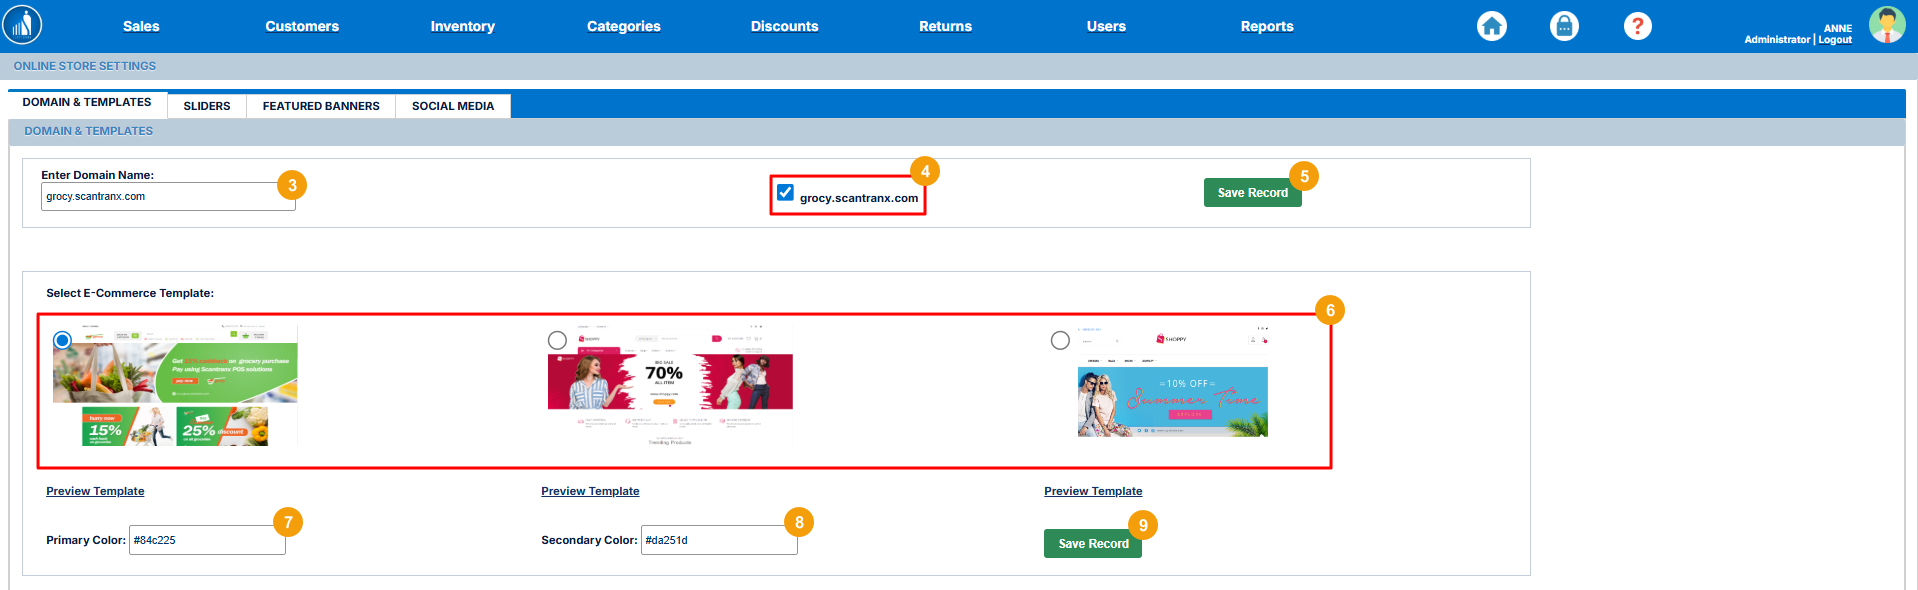
3. Under the Domain and Templates tab, enter your domain name.
4. Enable/disable the store by selecting/deselecting the link.
5. Click on Save Record.
6. Now, select the E-commerce Template.
Tip: You can preview the template by clicking on the Preview Template link below each template.
7. Specify the primary color.
8. Specify the secondary color.
9. Click Save Record.
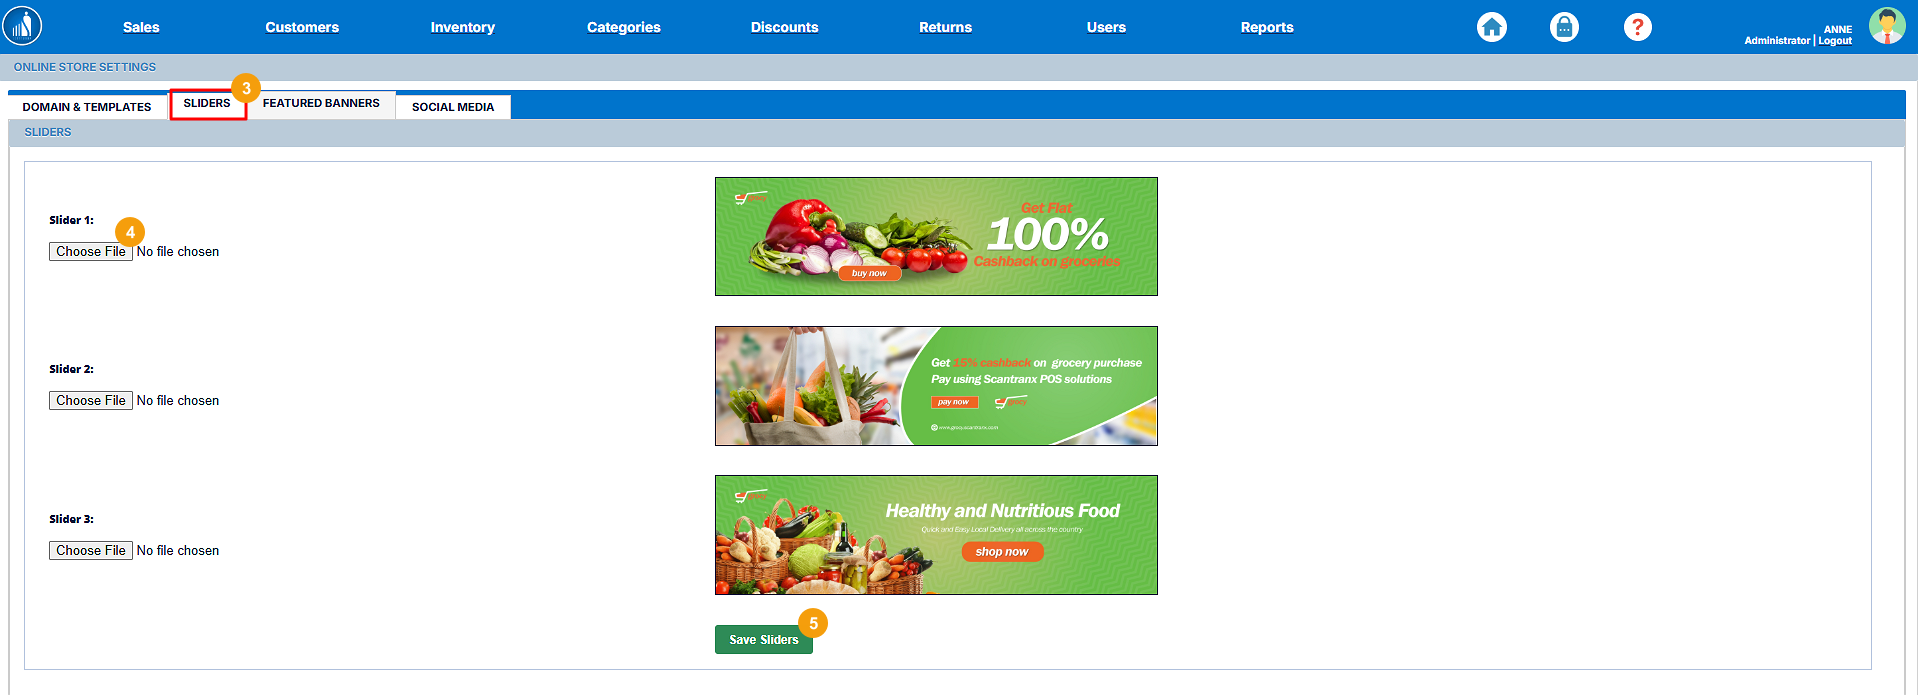
How to Add Sliders?
1. Go to the Settings tab.
2. Select Online Store.
3. Switch to the Sliders tab.
4. Click on Choose File and select the slider image.
You can upload up to 3 images.
5. Click Save Sliders.
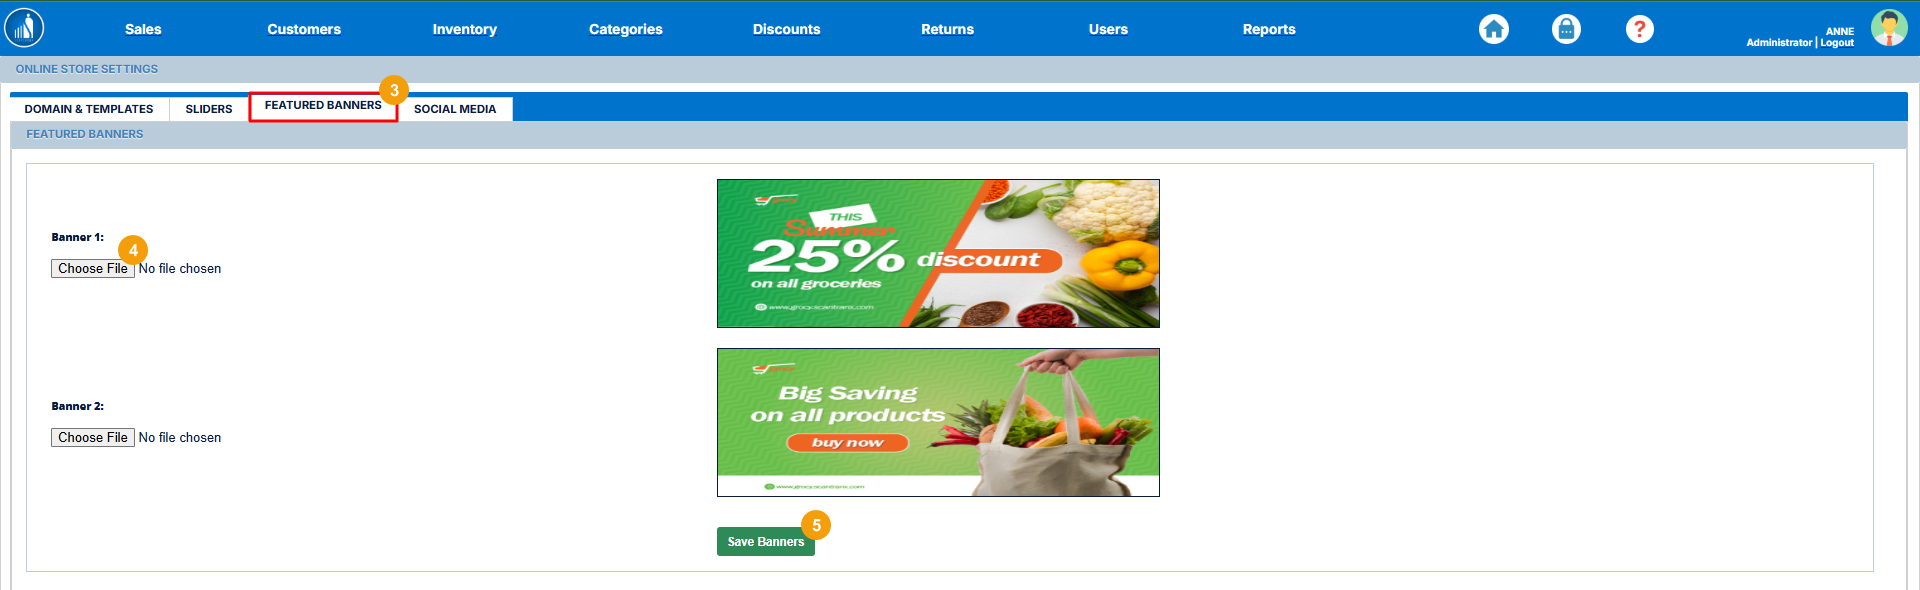
How to Add Featured Banners?
1. Go to the Settings tab.
2. Select Online Store.
3. Switch to the Featured Banners tab.
4. Click on Choose File and select the banner image.
5. Click Save Banners.
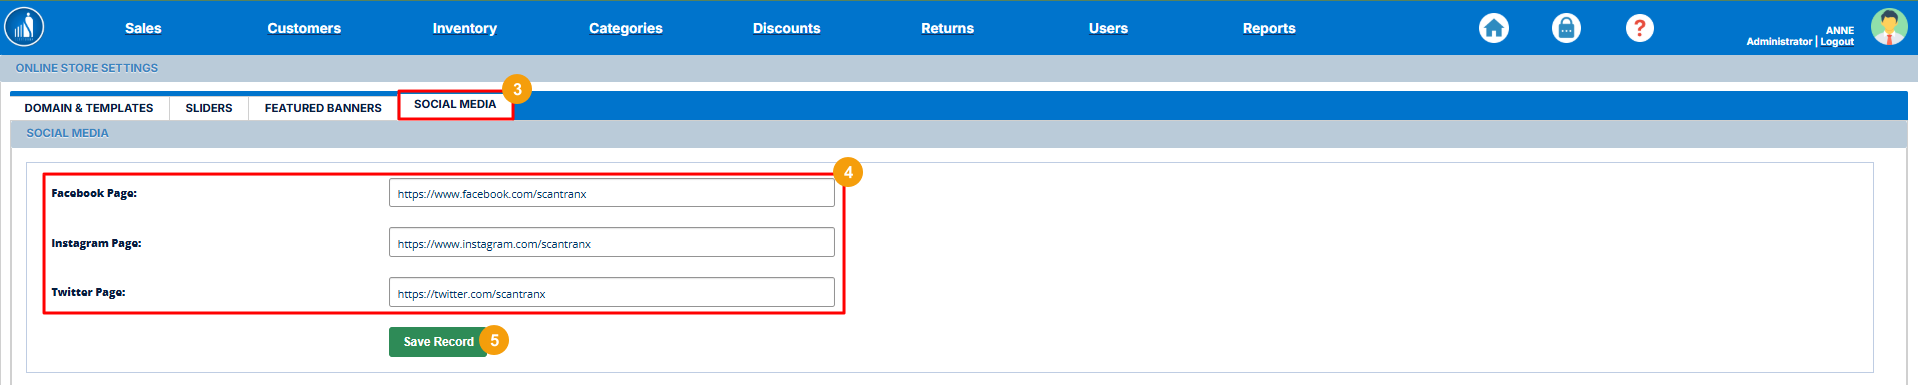
How to Add Social Links?
1. Go to the Settings tab.
2. Select Online Store.
3. Switch to Social Media.
4. Enter the links to your social platforms.
5. Click Save Record.
Payment Gateway Settings
You can configure the gateways through which you want to receive the online payments under the Payment Gateways settings.
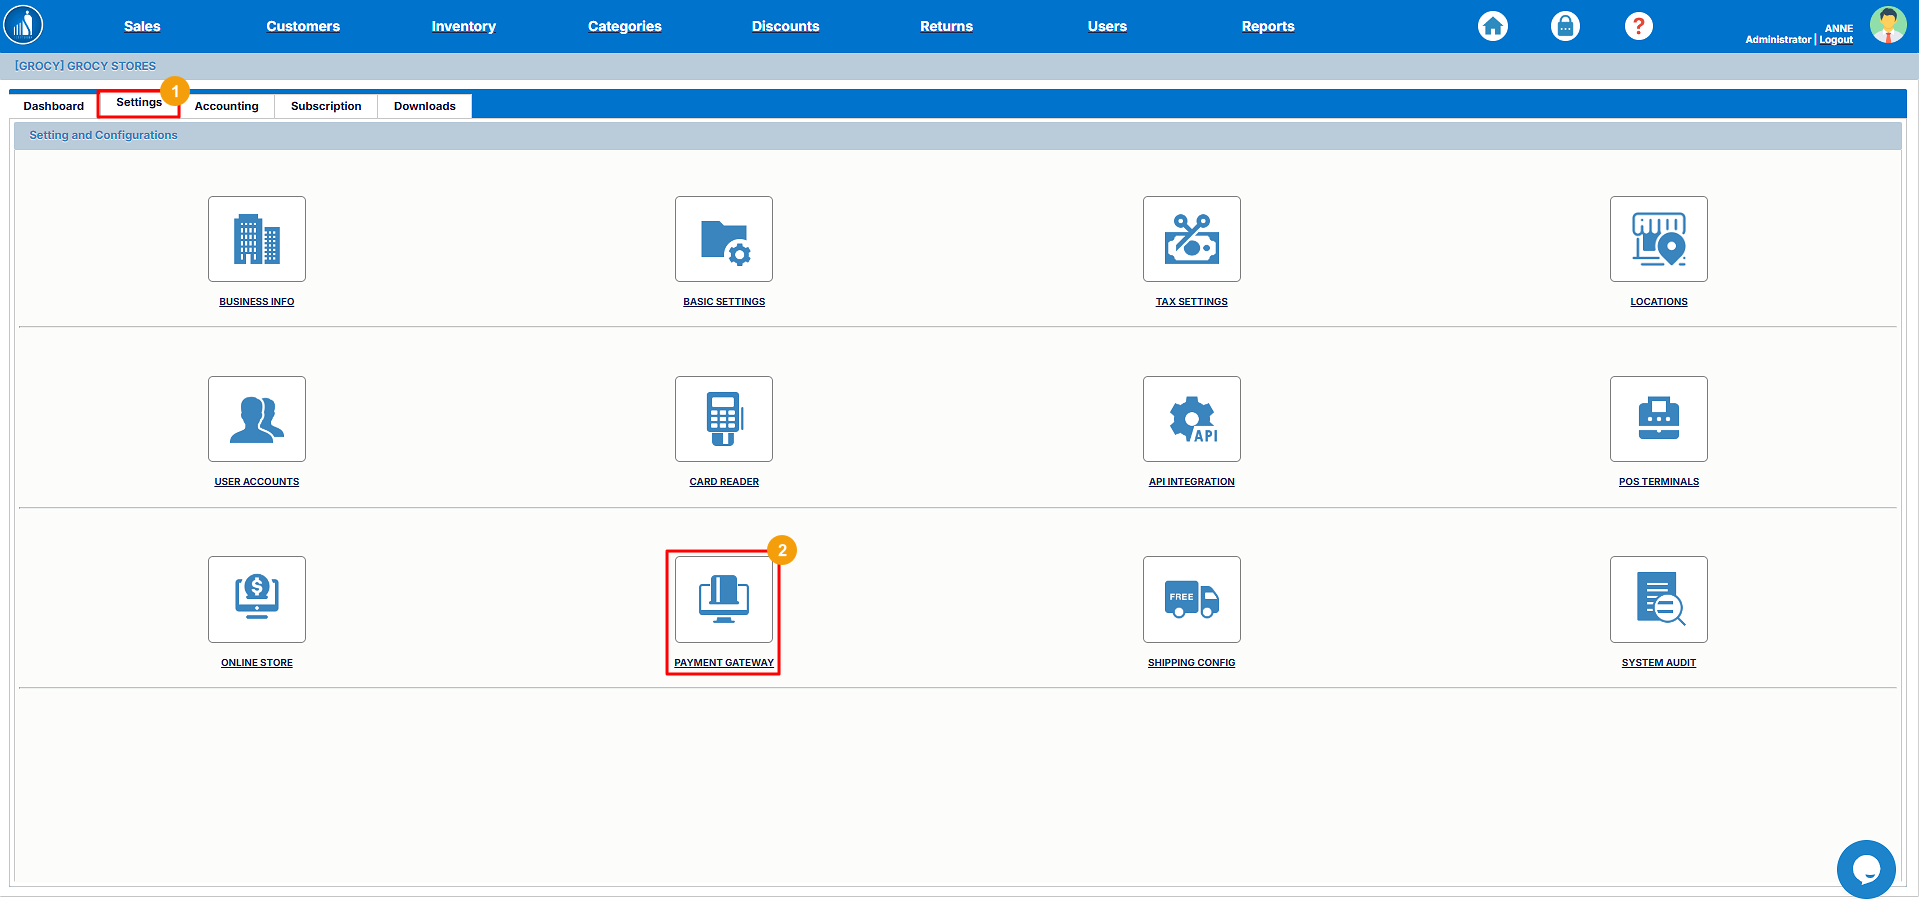
How to Configure a Payment Gateway?
1. Go to the Settings tab.
2. Select Payment Gateways.
3. Select a payment gateway.
4. Click Configure.

5. Enter the public key.
6. Enter the secret key.
7. Click Configure Gateway.

Please note that in order to configure a payment gateway, you must have a valid public and secret key. You can get these keys by signing up for your desired payment service providers.
How to Delete an Existing Gateway?
1. Go to the Settings tab.
2. Select Payment Gateways.
3. Click Remove before the gateway.

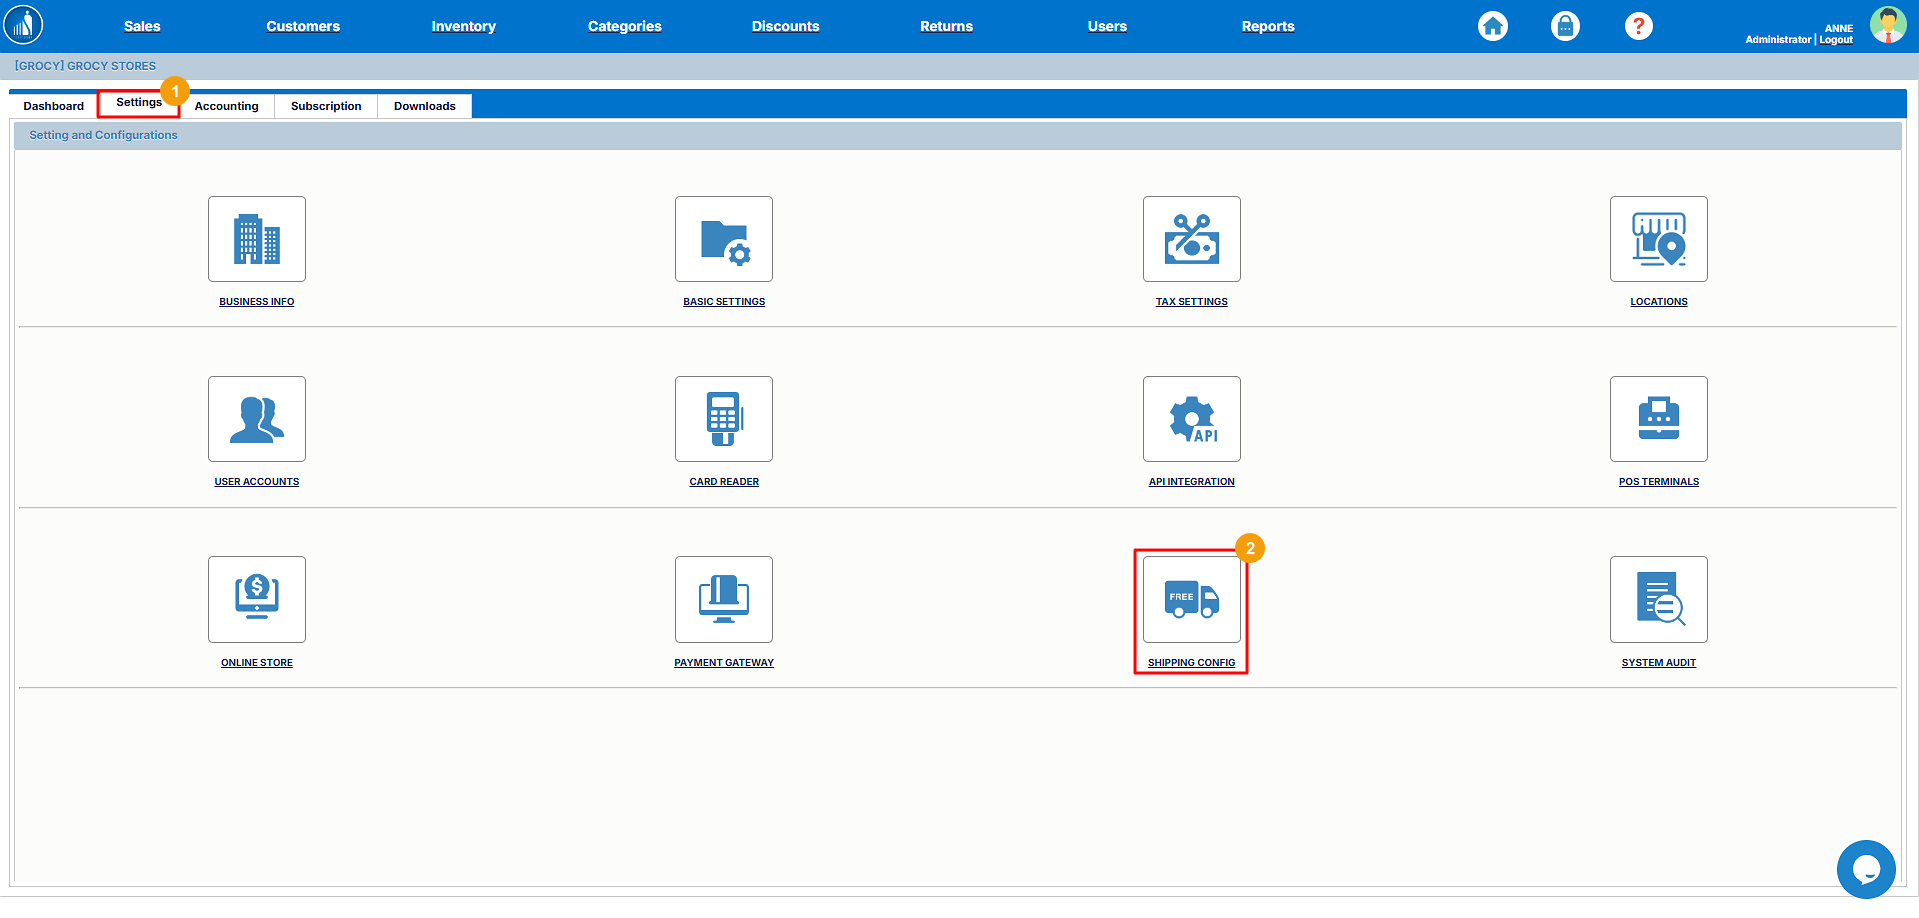
Shipping Configuration Settings
To set up your shipping methods for online deliveries, you can configure them under the Shipping Config settings.
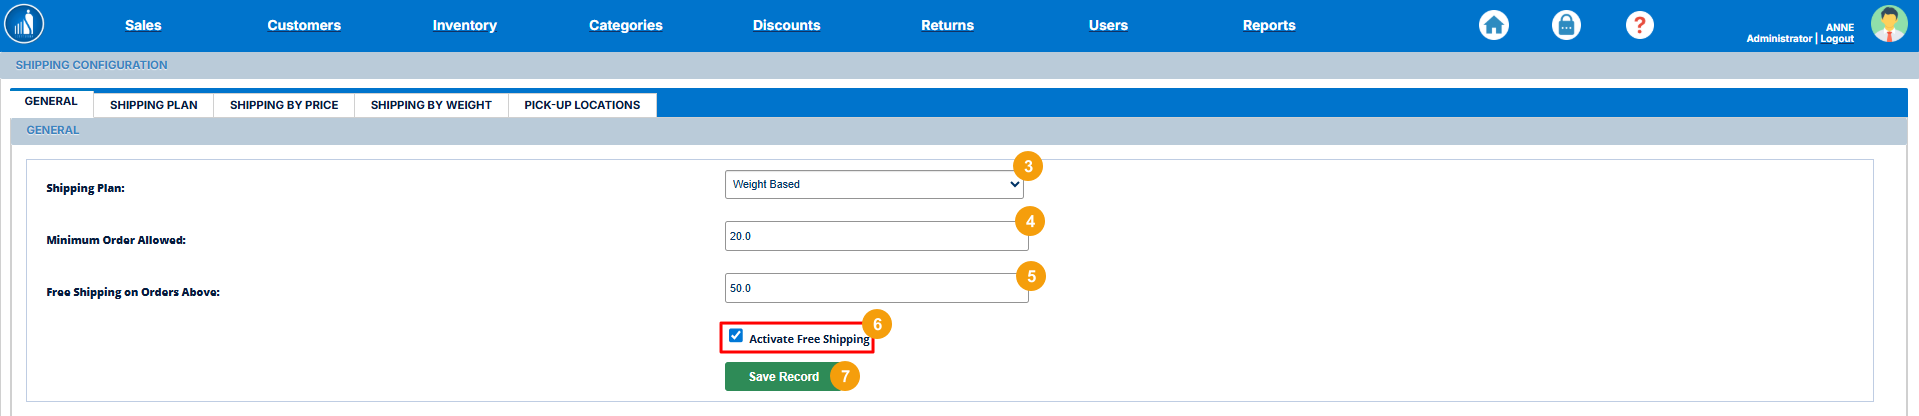
Basic Shipping Settings
Under the general shipping settings, you can select a shipping plan and other options. The available shipping plans include:
i. Weight-Based: The shipping is calculated according to the weight of the parcel.
ii. Price-Based: The shipping cost is calculated according to the price of the parcel.
To set up shipping preferences, follow these steps:
1. Go to the Settings tab.
2. Select Shipping Config.
3. Select a shipping plan.
4. Enter the minimum weight or price for the order.
The checkout will not proceed unless the order matches this weight or price.
5. Enter the limit for free shipping.
If the order exceeds this limit, shipping becomes free.
6. Select whether to apply free shipping or not.
7. Click on Save Record.
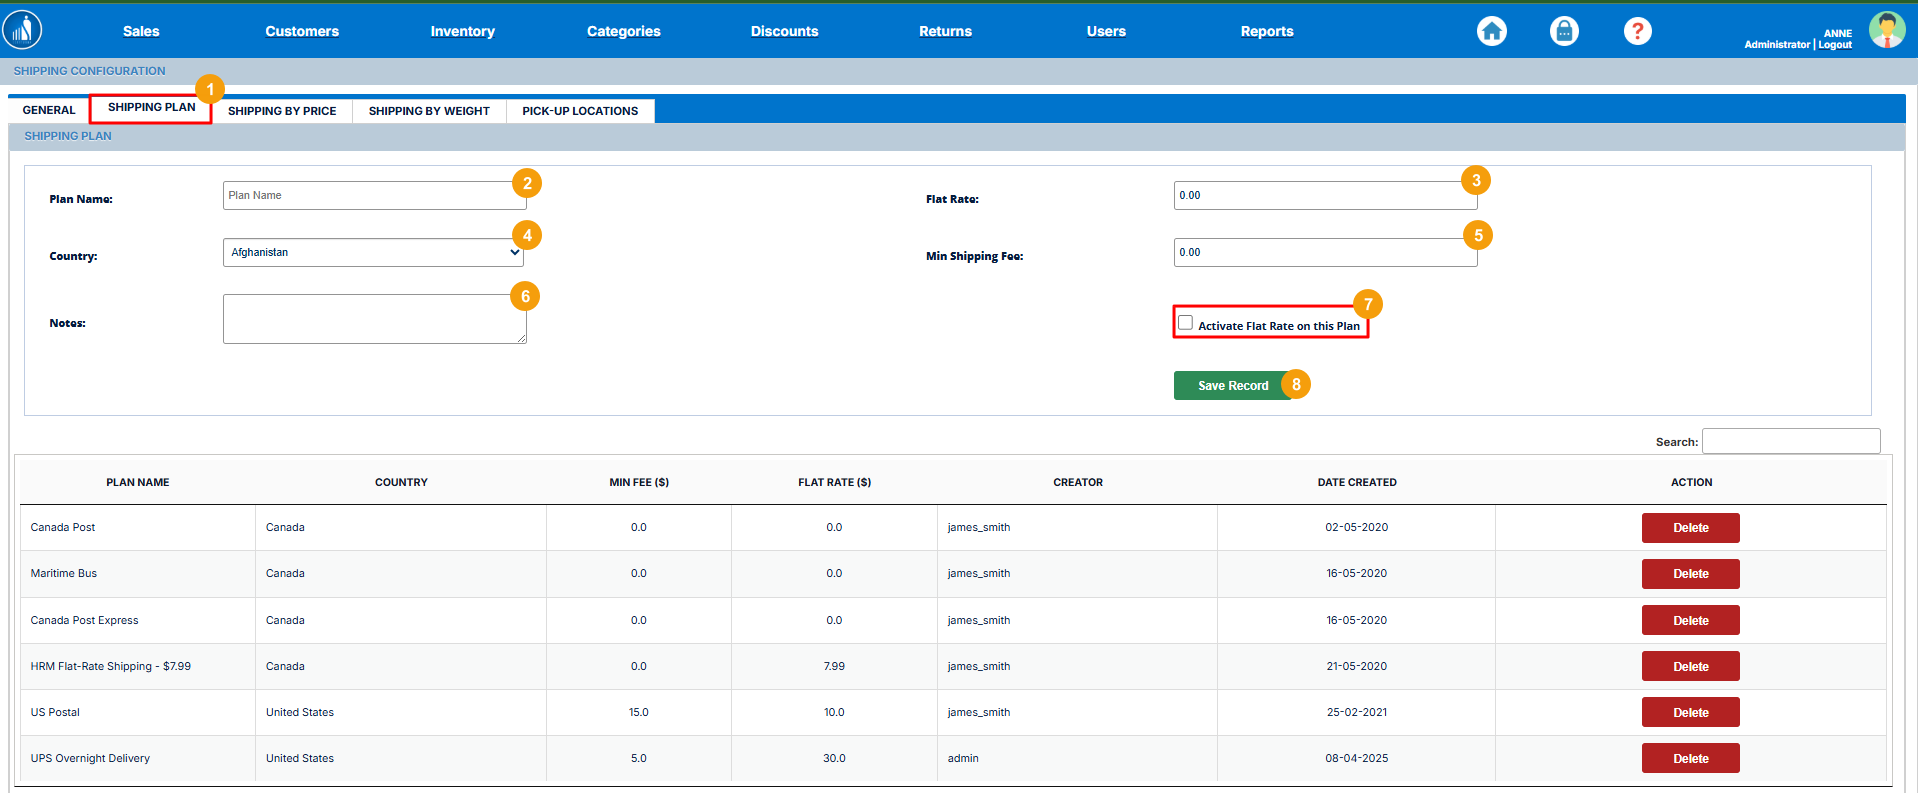
How to Add a New Shipping Plan?
The Shipping Plans refer to the shipping services available in specific locations.
1. Switch to Shipping Plan under Shipping Config.
2. Enter the plan name.
3. Enter the flat rate.
4. Select the country for which the shipping plan is valid.
5. Enter the minimum shipping fee.
6. Add notes.
7. Activate or deactivate the flat rate.
When enabled, all the shipments will cost the same regardless of the destination.
8. Click Save Record.
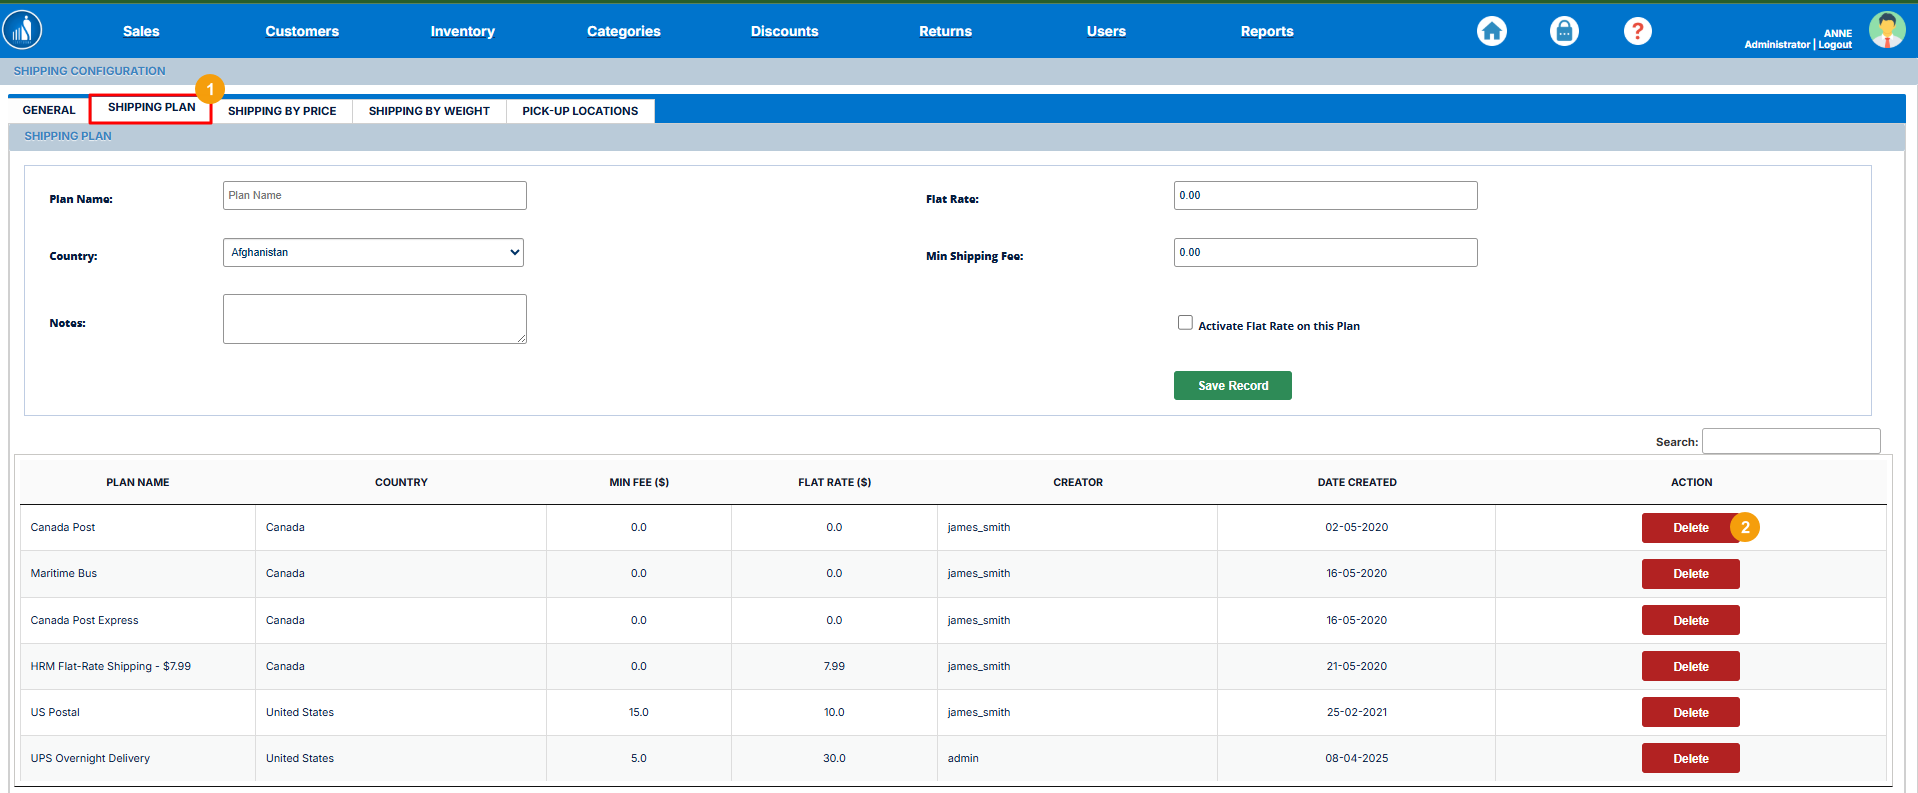
How to Delete an Existing Shipping Plan?
1. Switch to the Shipping Plan tab under Shipping Config.
2. Click on the Delete button before the shipping plan.
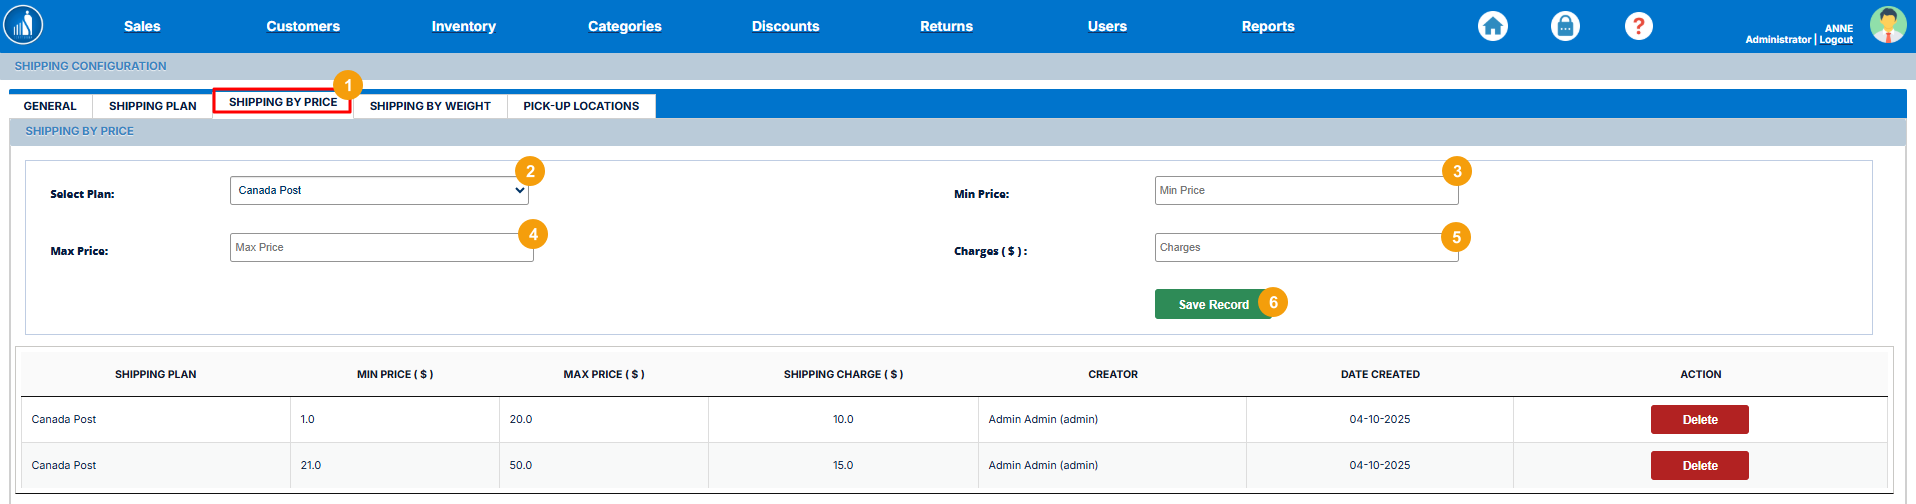
How to Set Up Shipping By Price?
You can also set up minimum and maximum prices for each shipping plan in your store. The orders falling under the specified price range will be shipped for the cost specified as follows:
1. Switch to the Shipping By Price tab under Shipping Config.
2. Select a plan.
3. Enter the minimum order price.
4. Enter the maximum order price.
5. Enter the shipping charges.
6. Click Save Record.
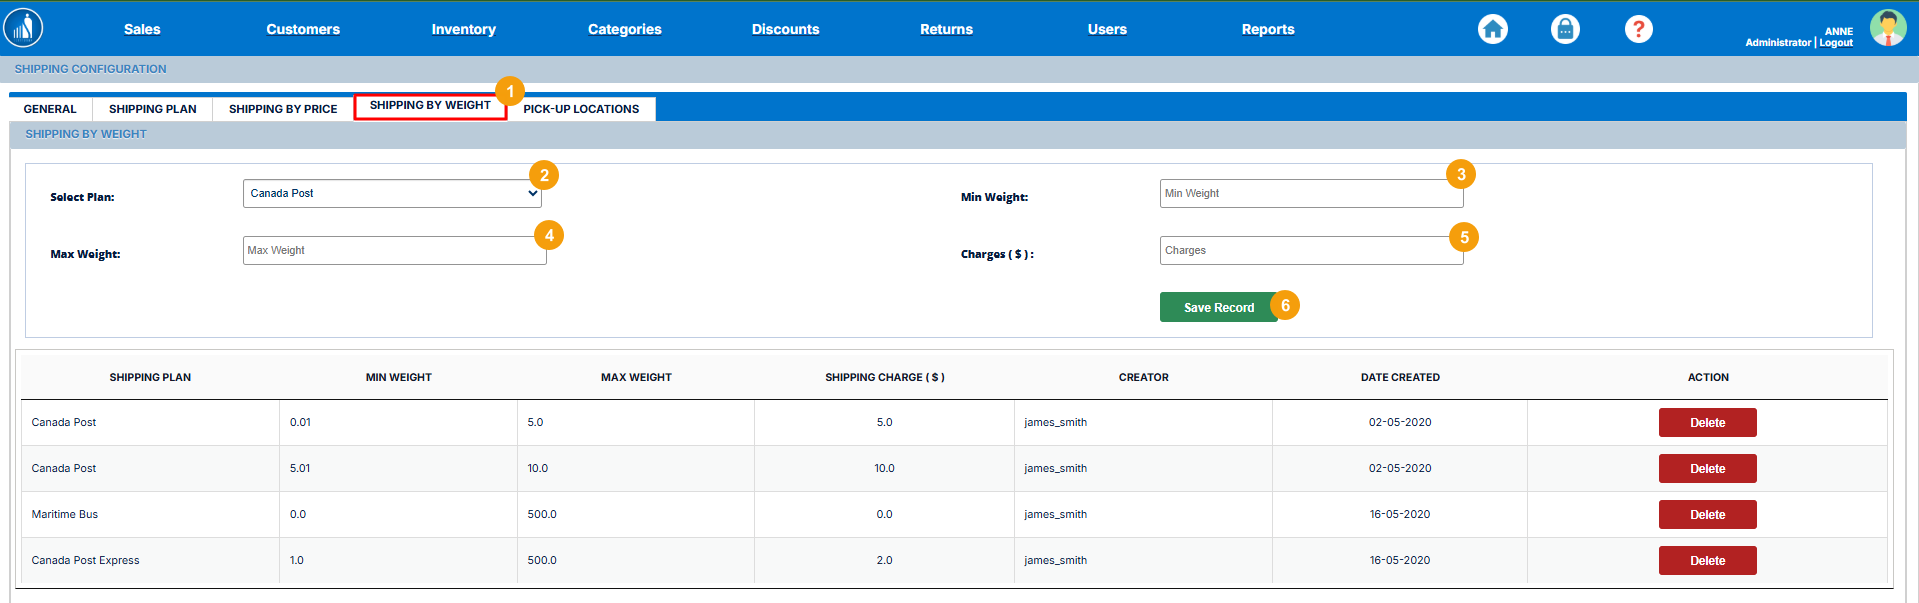
How to Set Up Shipping By Weight?
You can set up the minimum and maximum order weight for each shipping plan in your store. The orders weighing under the specified range will be shipped at the cost specified as follows:
1. Switch to the Shipping By Weight tab under Shipping Config.
2. Select a shipping plan.
3. Enter the minimum order weight.
4. Enter the maximum order weight.
5. Enter the shipping charges.
6. Click on Save Record.
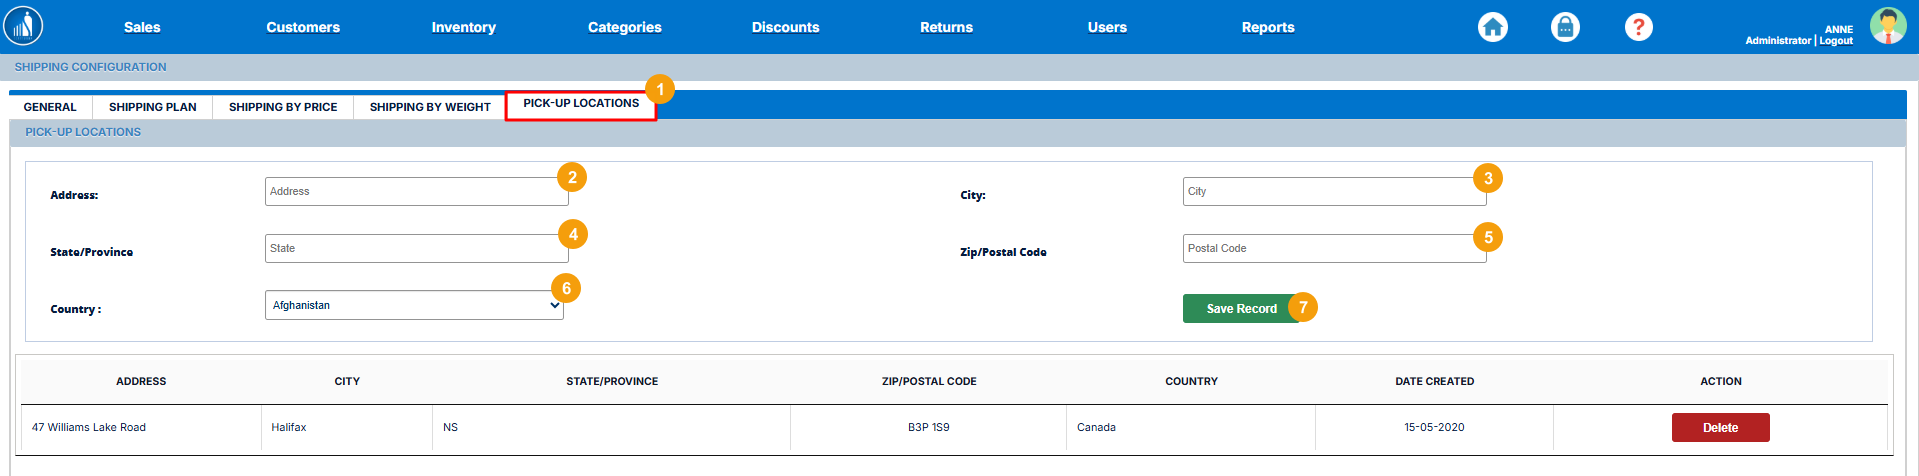
How to Set Up the Pick Up Locations?
If your store offers order pickup, you can set up the pickup locations as follows:
1. Go to the Pick-Up Locations tab under Shipping Config.
2. Enter the pickup address.
3. Enter the city.
4. Enter the state/province.
5. Enter the zip or postal code.
6. Select the country.
7. Click Save Record.
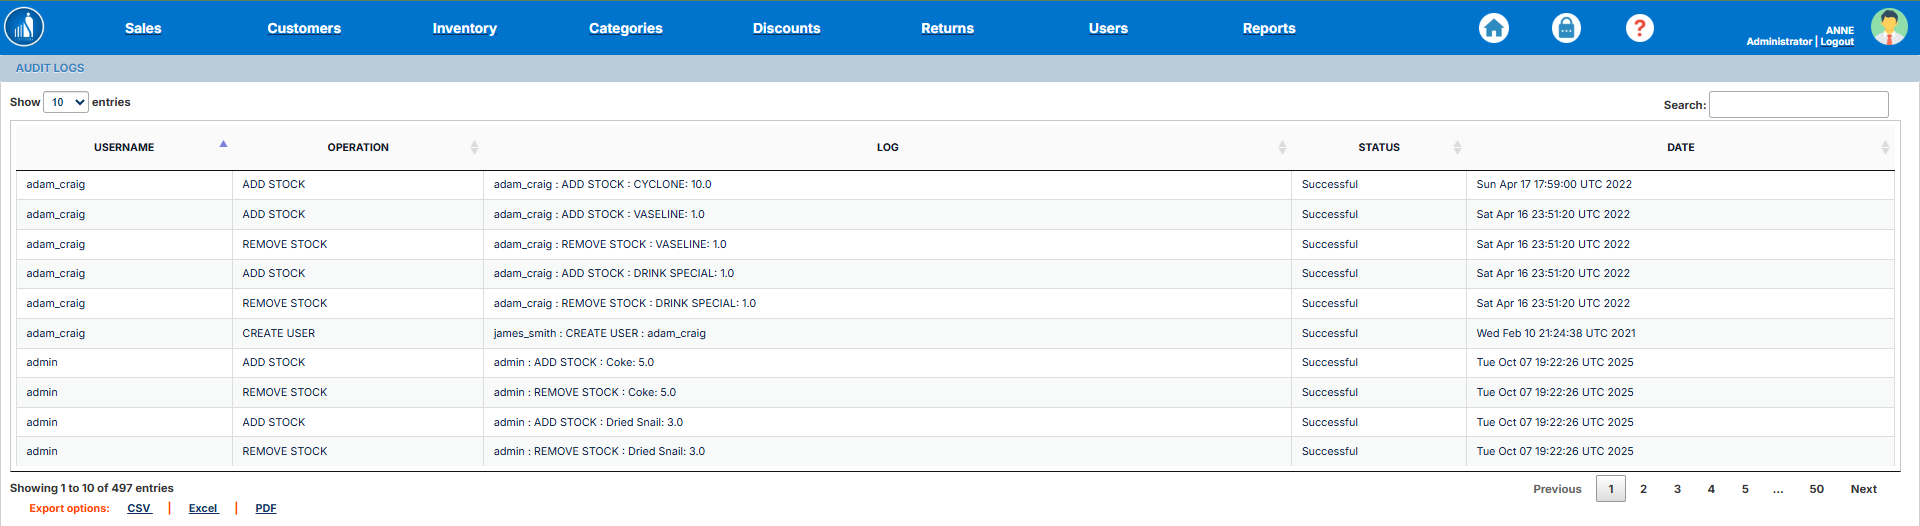
Auditing System
You can view the system audit log under the System Audit option under Settings.
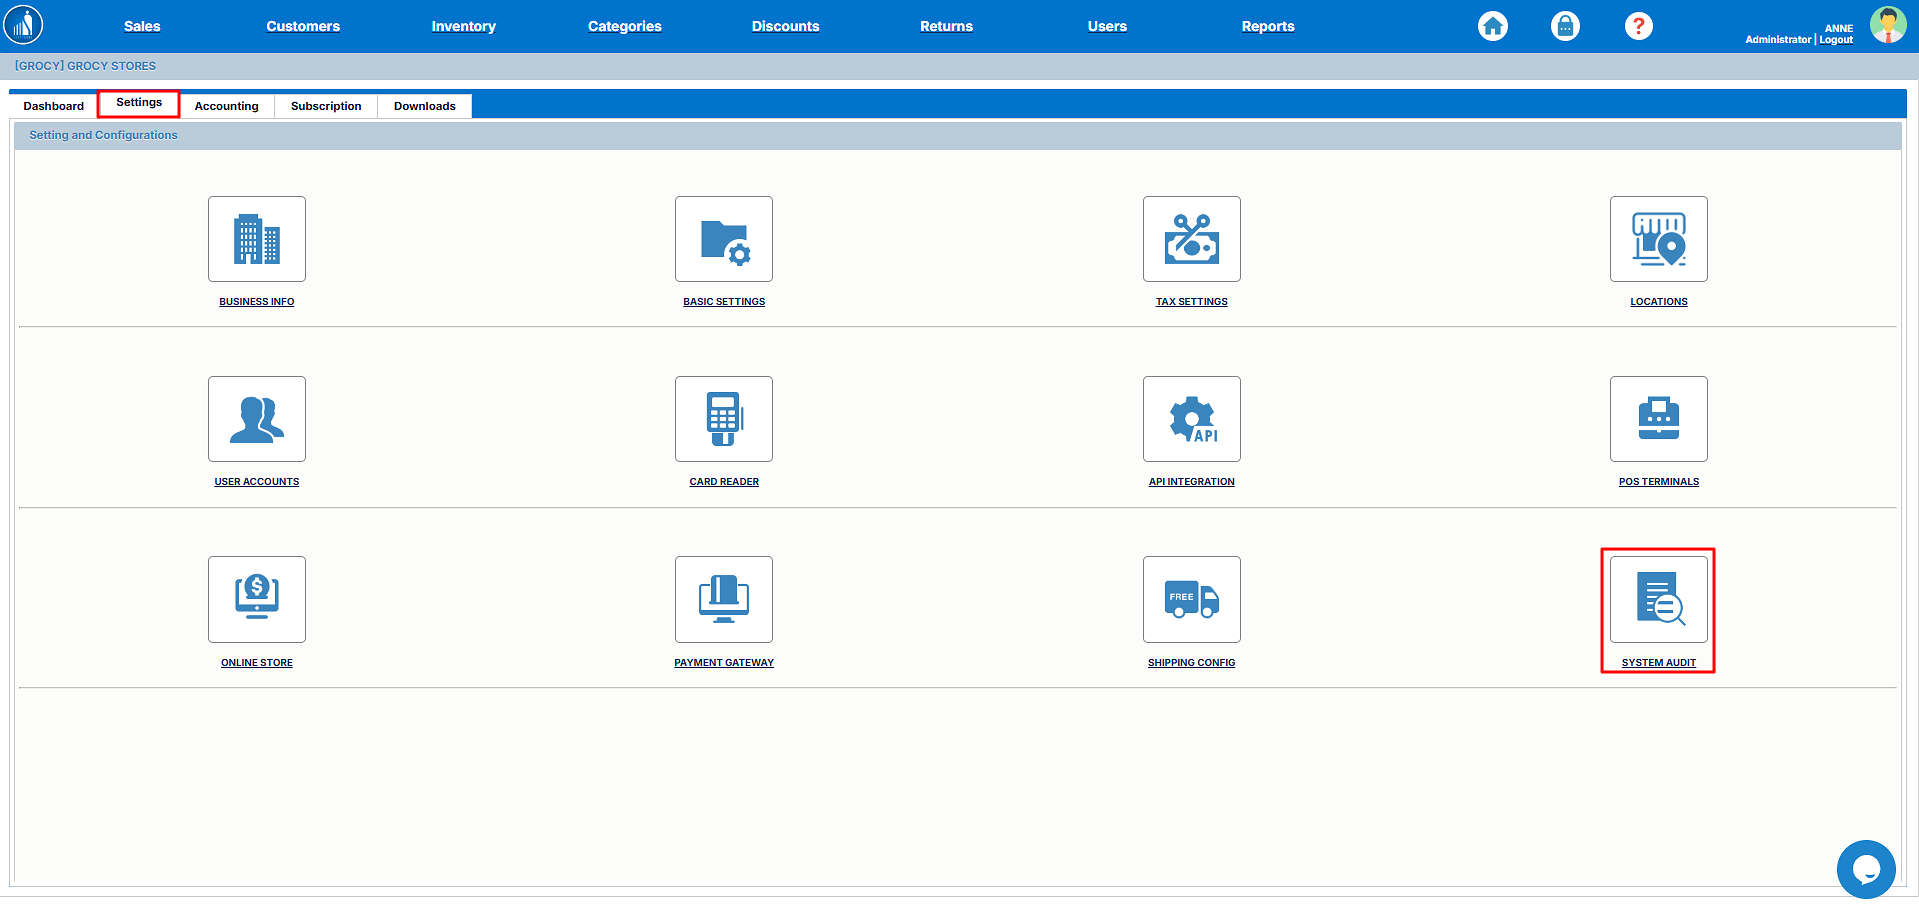
It shows a log of when a particular operation was performed, by whom, and whether it was successful or not.